
Adjustments and Modifications – Step by Step to a Customized Horseshoe
At this point, we would like to provide you with a brief overview of how you can optimally adjust our horseshoes to fit the hoof. Of course, this also includes possible modifications such as removing the quarter clips or grinding a deeper tread pattern.
Most of the information on this page applies to both our composite horseshoes and the pure urethane models.
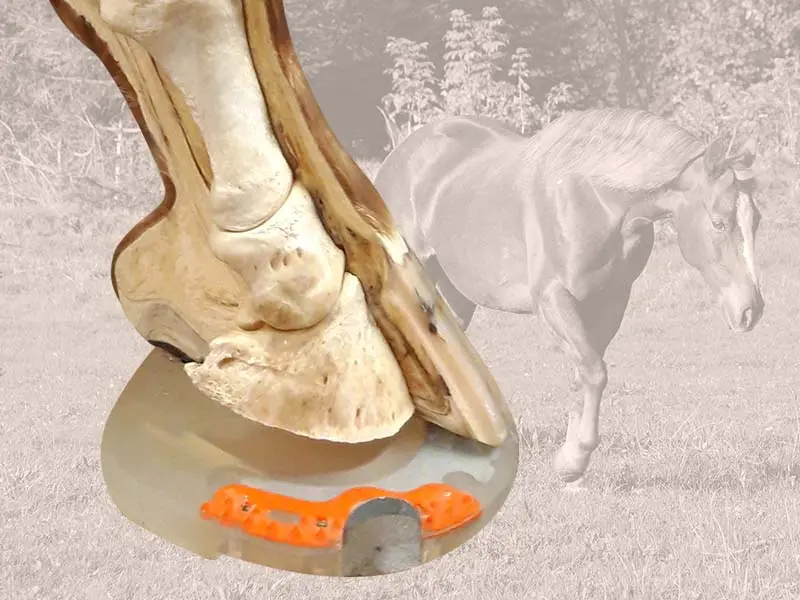
With its metal inlay, the composite horseshoe offers protection and support for the coffin bone and, at the same time, flexibility and shock absorption for the inner soft tissue structure, tendons and ligaments.
With four different shapes (round / oval / STS / open-toed ) and sizes in 4mm steps (8mm steps from size 182mm on), there is a perfect horseshoe available for (almost) every horse.
However, in order for the hoof to optimally benefit from the functionality of the horseshoe and to make sure the horseshoe doesn't get lost during the regular shoeing period, it is necessary to adjust the horseshoe to the hoof shape before shoeing.
Choosing Model, Shape, and Size
First, select the horseshoe that best suits your needs. Depending on whether you're planning a long trail ride with your horse or participating in eventing tournaments, you'll naturally have different requirements for the ideal horseshoe. If you're unsure which composite horseshoe is best for your horse and your discipline, feel free to reach out — we're happy to assist you.
Choosing the Right Shape
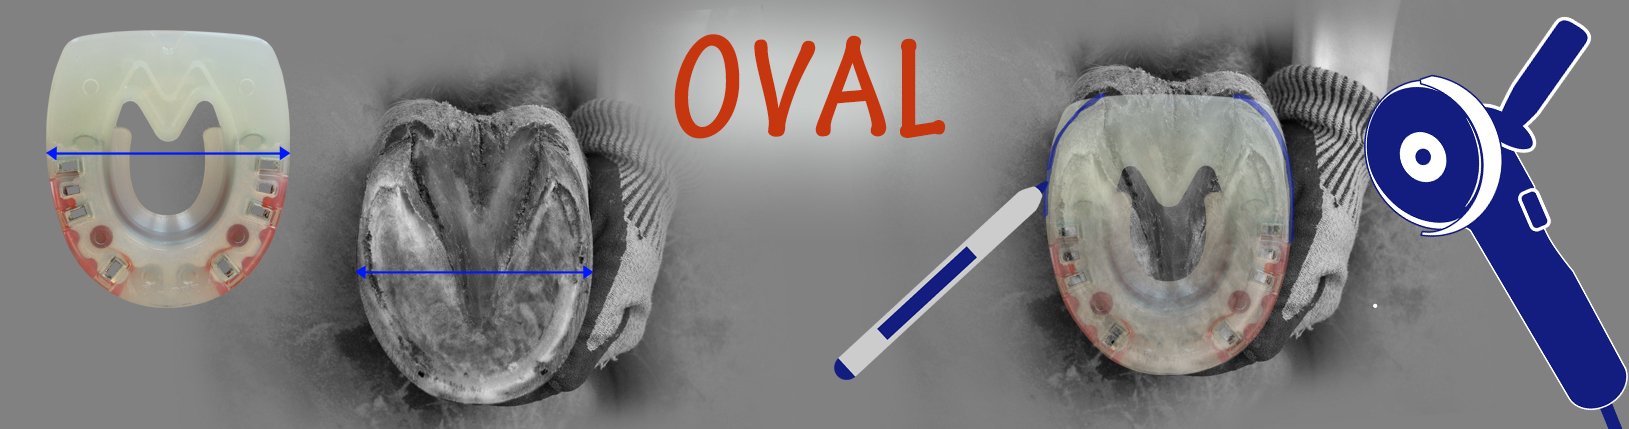
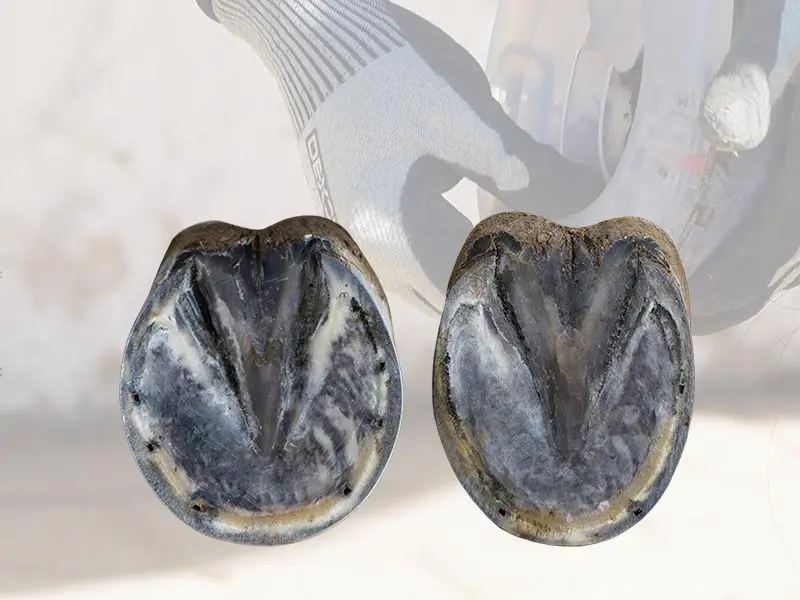
Usually, you need round horseshoes for the front hooves and oval ones for the hind hooves.
But, as always, there are exceptions.
The decision for or against an STS model, however, isn't only based on the hoof shape but
also on the locomotor mechanics of the horse. With the straighter toe area, you can
position the horseshoe slightly towards the heels and facilitate breakover.
Choosing the Right Horseshoe Size
The horseshoe size indicated always tells the width of the horseshoe in millimeters.
Currently, our horseshoes are available from 50mm to 198mm depending on the model. The
smallest sizes are only available as pony shoes without a metal core; the largest horseshoes
are from our Heavy Duty
range, which is designed for breeds such as draft horses and horses in need of particular
durable shoes.
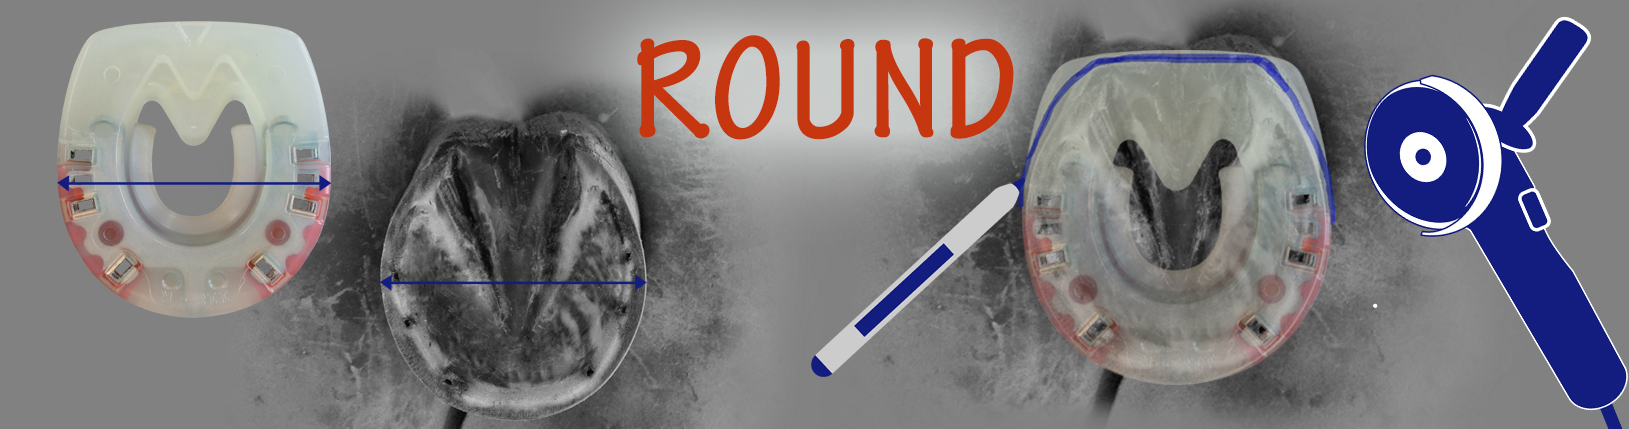
In order to determine the right size for your horse, use a measuring tape or a ruler to
measure the widest part of the newly trimmed hoof's bottom side - usually, it can be found
at a short distance behind the frog
apex.
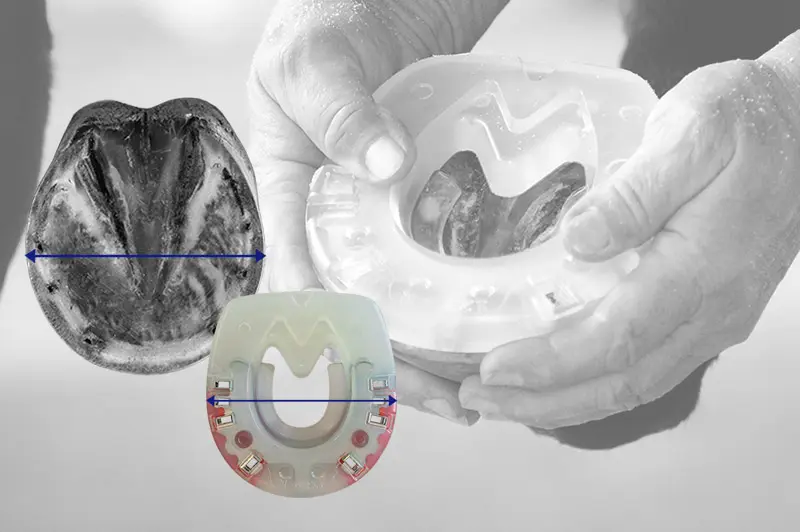
The marking indicates the widest point of the round hoof and the matching horseshoe.
Special Case: Composite Horseshoes with Threaded Holes for Studs
When choosing the correct shape and size of a horseshoe with stud holes, attention must
always be paid to the position of the threaded inserts.
If the stud holes are placed too far in the back, the horseshoe won't fit perfectly and
the risk of losing it increases. In general, a wrong position of the thread inserts does not
only increase the risk of losing the horseshoe but also the risk that the studs cause
indesirable pressure on sensitive areas of the hoof which can cause bruising or soreness.
The correct position for thread inserts is in the heel area.
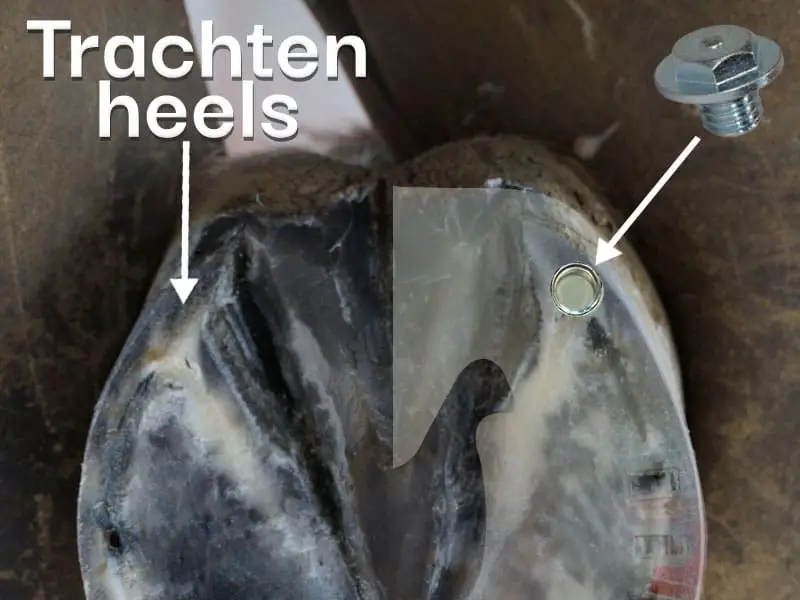
The marking shows the position of the stud holes on the hoof.
Special Case: Removal of Quarter Clips
Most of our composite horseshoes have quarter clips that you can easily remove as needed.
You can use your standard angle grinder. We recommend removing the clips
piece by piece and in turns because of the heat that develops and causes the synthetic
material to melt. Take into account the safety risk due to potential sparks. Try to preserve
as many knobs
as possible! You can also partly remove the metal on the bottom side of the
horseshoe if you'd like to round the shoe off.
If you plan to use the horseshoe as an adhesive shoe, please note that you will not achieve
a plastic weld in the area of the removed quarter clips.
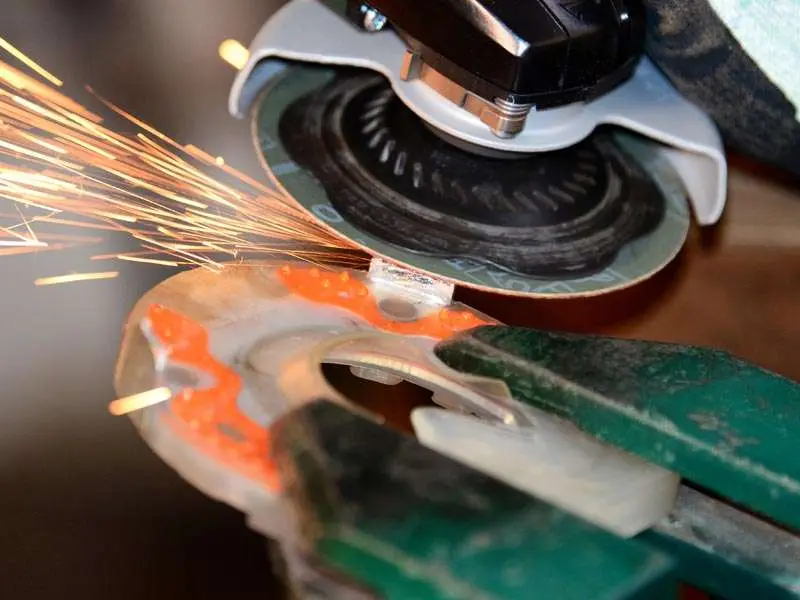
Grinding off the quarter clips of the horseshoe.
Customizing the Horseshoe to the Individual Shape of the Horse's Hoof
We have noticed that our horseshoes are often chosen solely based on their width, and users do not consider necessary adaptations or modifications, especially in the heel area. That may work out in many cases. However, if a horseshoe isn't properly shaped to the hoof, the risk of loss and injuries increases — not only for your own horse but for the complete herd! The nails and possible quarter clips of a lost horseshoe (never mind whether it's a composite horseshoe or a steel shoe) can cause severe injuries. In addition, a lost horseshoe can always take a part of the hoof wall with it.
Thus, we would like to address the precise adaptation of the shoe to the horse's hoof at this point, including all optional modifications as well as small tips and tricks that can be implemented without additional accessories.
Adjust the Horseshoe to the Hoof
Even if the selected shoe size seems to fit well at first glance, it is still necessary to adapt the shoe optimally to the individual hoof; this applies equally to pure plastic shoes as well as composite horseshoes.
The individual customization of the horseshoe is always at the discretion of the on-site
farrier.
We recommend always taking a careful look at the overall fit of the horseshoe and adjusting
the horseshoe, where necessary, to the shape of the hoof using an angle or belt grinder.
Following this, additional adjustments and optional modifications can be made.
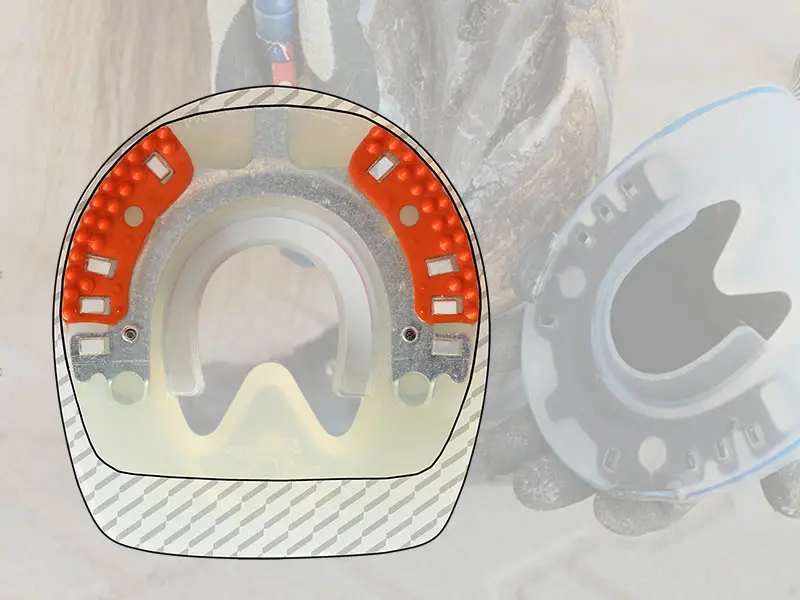
The graphic shows to which extent you can usually modify the composite horseshoe without affecting its functionality. However, there are exceptions to this as well.
Shaping a Horseshoe More or Less Wide
(Optional Modification)
You can also change the width of the horseshoe at your own discretion. In order to make it
wider, you put it either
on a small parallel vise with a narrow or narrow-ground jaw or – if the horseshoe is small
enough – on a pair of pincers.
You can make a large horseshoe less wide with your hammer. Be careful not to twist the metal
core! If necessary, you can straighten the metal core with some well-directed hammer blows.
If you work with our horseshoes frequently, we would like to recommend the Duplo Shoe Spreader at this point.
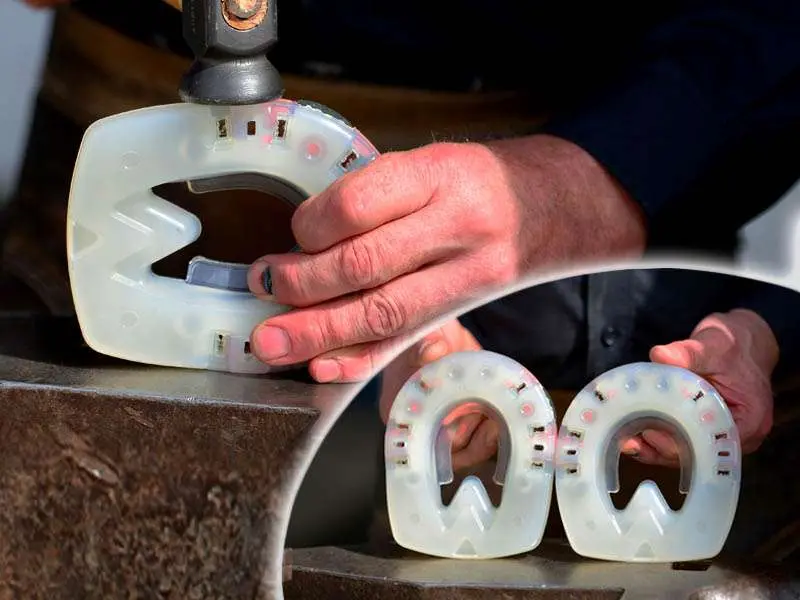
Original horseshoe and modified, narrower version.
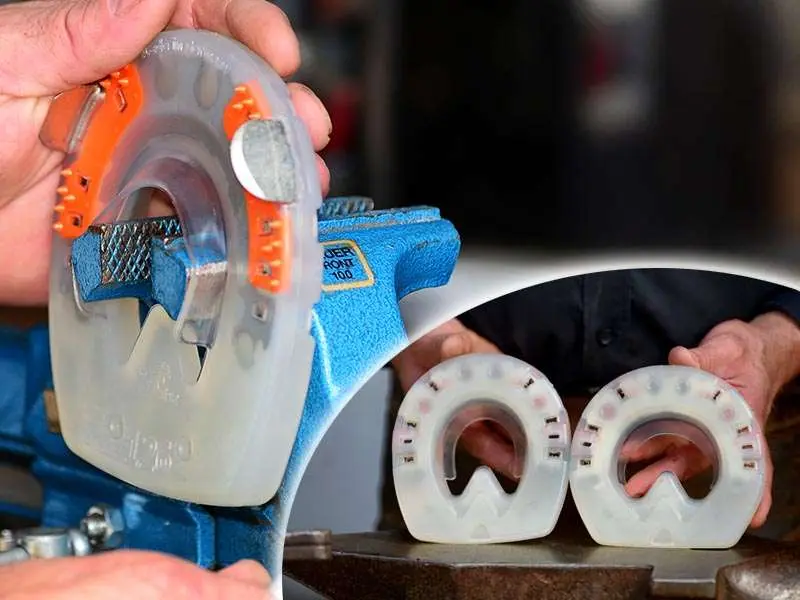
Original horseshoe and modified, wider version.
Increasing Length or Width (Optional Modification)
You can lengthen or widen our horseshoes as needed by adding plastic welding strips.
Please note the following model-specific restrictions:
- Due to its steel border around the toe, the Arizona can only be lengthened in the heel area.
- Straight Bar and Full Branch Shoes should not be modified with extensions.
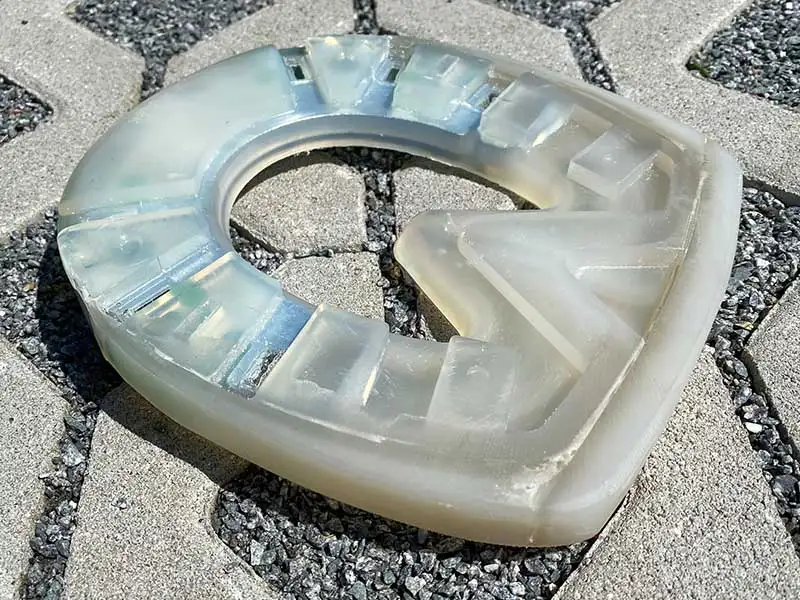
A composite horseshoe that has been widened and lengthened.
Check and Adjust the Position of the Knob Arrays
Most of our horseshoes feature sturdy, integrated knob arrays. The Nailless
and the pure urethane Classic
model have soft knobs resulting from the manufacturing process. Special models such as the
open-toed horseshoes, the base plate, the Basic
and the Full
Branch Shoe
as well as the pony horseshoes do not have any knobs at all.
In case of sensitive horses with irregularly shaped or very flat hooves, we recommend
removing the inner knobs so they won't exert pressure on the sole. If you intend to glue on
the horseshoe or use it as a cast shoe, we generally advise removing all knobs. If you
intend to
use the
horseshoe as a wedge shoe, you will find additional information regarding the knobs in the
product description of the wedges.
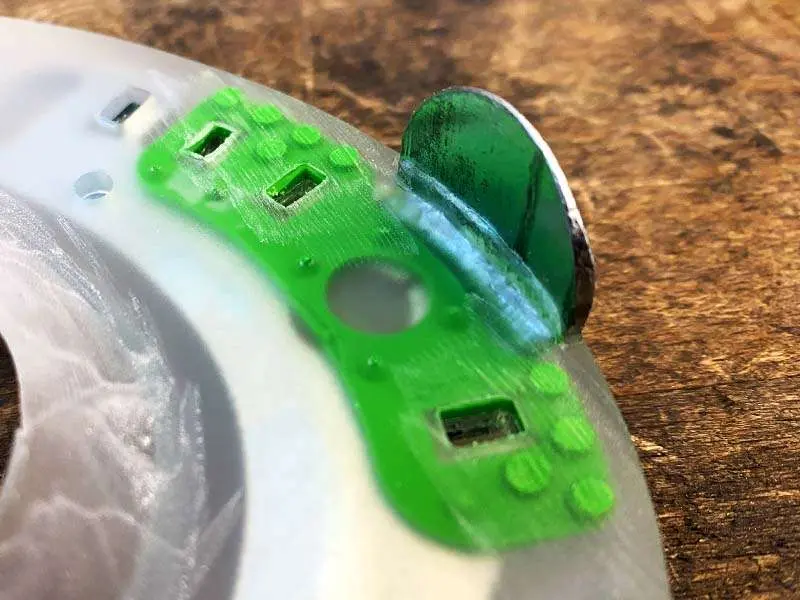
Horseshoe after the knobs have been removed.
Adjust the Debris Guard
(Optional Modification)
Most of our horseshoes have a molded synthetic rim, also known as debris guard
, which
considerably reduces the accumulation of snow, sand, and debris.
Some horses have very flat hooves and are extremely sensitive, so adjusting the debris guard
may be necessary. In this case, we recommend trying to grind the guard thinner instead
of completely cutting it out, so that its basic function can be preserved.
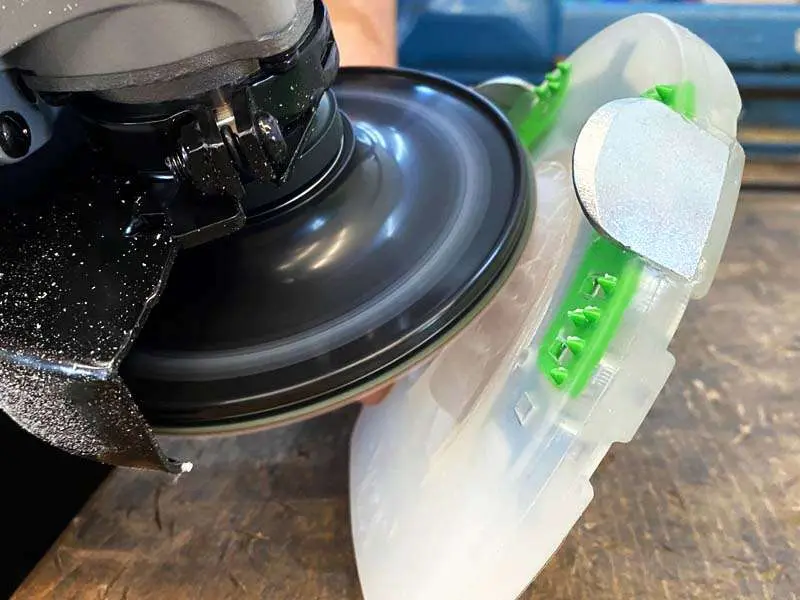
Modifying the debris guard of the horseshoe.
Toe Rocker — Early Breakover
(Optional Modification)
There are different ways of creating a Toe Rocker
on a composite horseshoe. For example, you
can treat the shoe with your angle grinder.
Another option, although not commonly utilized, is to modify the toe rocker by bending it.
Fixate the horseshoe at the edge of the anvil or in a parallel vise and reshape it with your
hammer.
If you want to position the horseshoe a little further backwards to achieve an earlier
breakover point, our STS shoes could be a possible alternative for you. The STS models are
available in a round shape with a straight toe and already have a certain rocked toe.
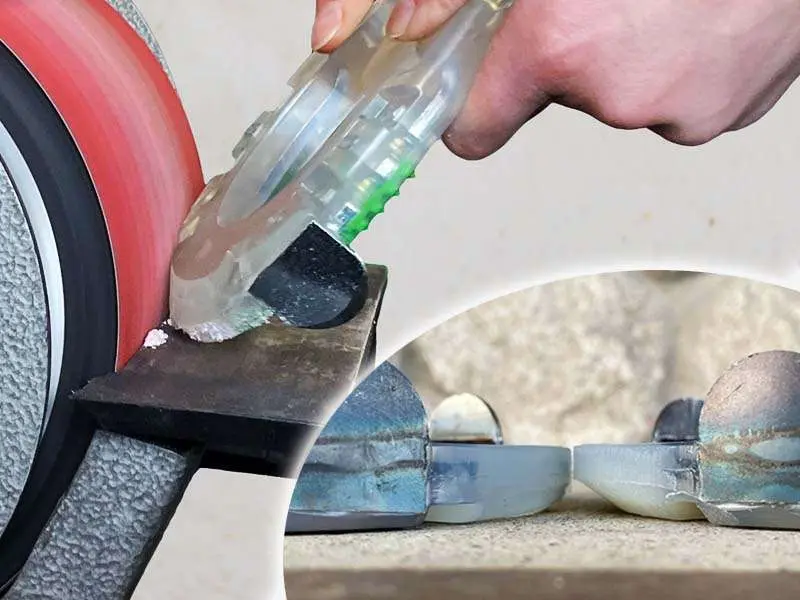
Modifying the horseshoe with the belt grinder.
Adding a Bevel
After having shaped the horseshoe, it's time for the finishing touches: adding a bevel to
the
upper and lower border of the horseshoe.
With a bevel on the hoof side as well as on the bottom side, the horseshoes will glide off
each other more easily if the horse steps on the front shoes with its hind hooves.
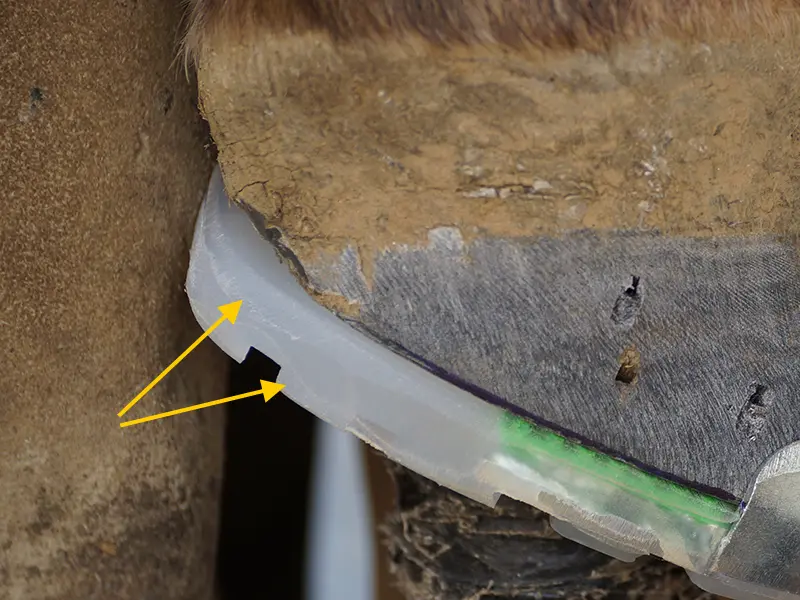
Bevel on the upper and lower border of the shoe.
Optional Modifications for Special Requirements
Protection against Forging, Thrush, Shoeing with Padding Materials & More
Here we would like to show you a few additional ways to modify the horseshoes for special requirements.
Adding an Additional Protection against Forging
If your horse makes large steps with its hind legs and is (despite all adjustments) prone to
forging, you can add an additional protection against forging on the bottom side of the
horseshoe. Thanks to the additional incision in the heel area, the shoe gives way more
easily and it is less likely for the horse to pull the shoe off.
This modification is not possible with Straight Bar horseshoes featuring a solid crossbar or with the Full Branch Shoe.
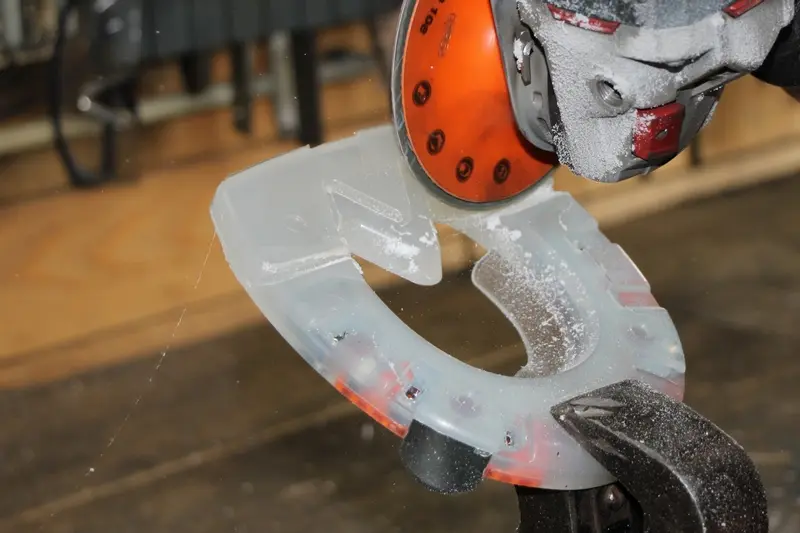
Adding an additional protection against forging.
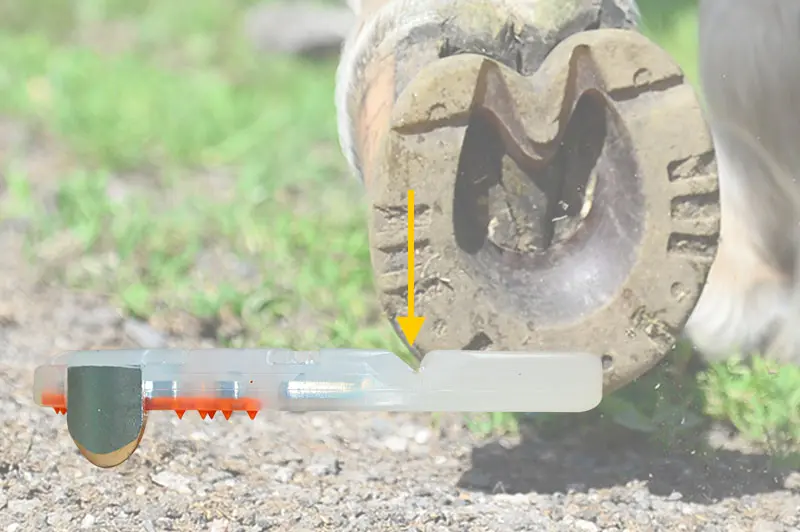
Protection against forging.
>Modifying the Synthetic Bar
Basically, the bar's purpose is to maintain the frog's health by providing it with constant
ground contact. With a healthy, functional frog, we recommend not removing the synthetic bar
from the
horseshoe. The situation is different, for example, in case of thrush
: Some farriers raise
concerns over shoeing thrush horses with composite shoes because they are closed over the
frog and
don't let fresh air circulate in the problematic area.
In particular in case of thrush it can be helpful, to modify the horseshoe in such a way
that there is a free space at the central groove and the posterior part of the collateral
grooves so you can medicate them correctly.
The extent of the modification in the frog area should be based on the severity of
thecondition of the frog.
If, for example, in the case of thrush, there is already no contact between frog and the
ground even without a
horseshoe due to the severity of the thrush, it is advisable to completely remove the
plastic bar so that the frog can be regularly treated. Generally, it is possible to remove
the bar without affecting the stability of the composite horseshoe. If there is a deep
central sulcus but the frog still maintains ground contact overall, we often like to cut a
small triangle out of the bar. This allows the owner to regularly maintain the horse's frog.
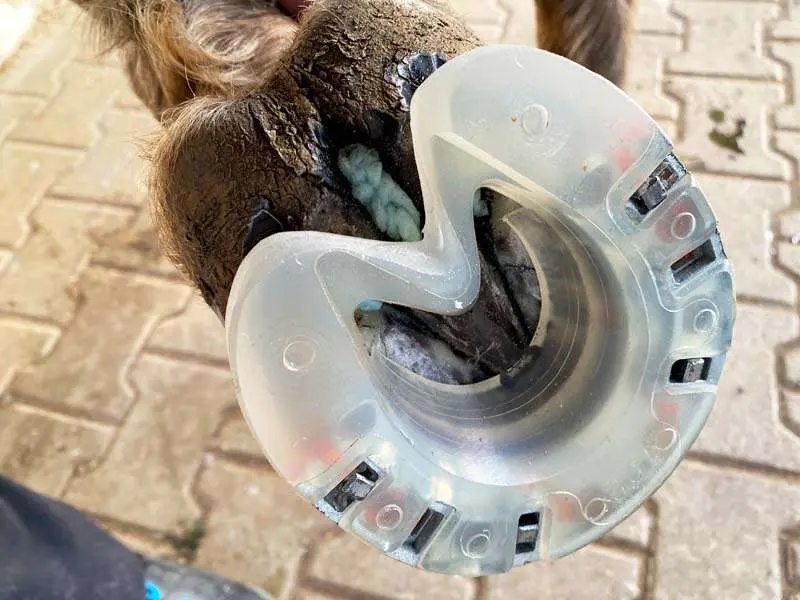
Horseshoe that has been modified above the central groove.
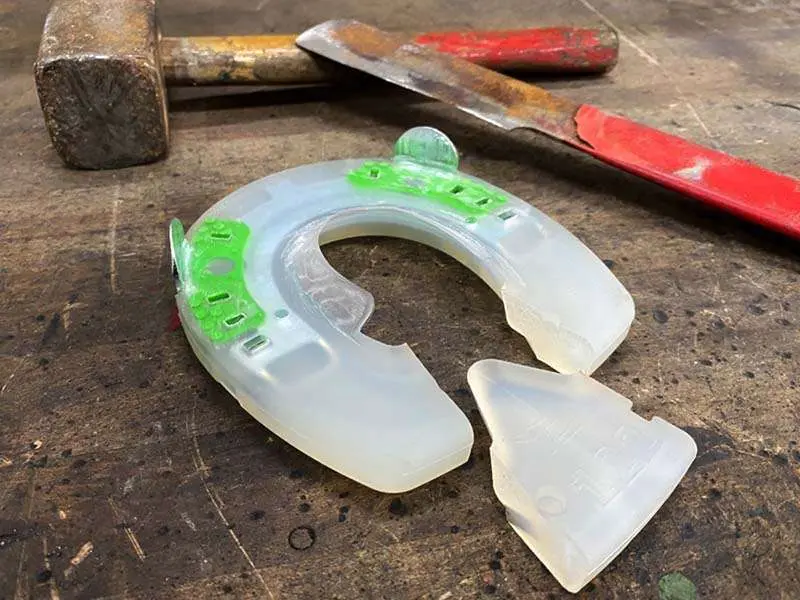
Removing the plastic bar of the composite shoe.
Closing the Sole Area
Just like with a traditional horseshoe, you can also close the sole area of our horseshoes
with
a plate. There are several options available for this purpose.
The Hoof Sole Protector
is available in a precise fit for round and oval horseshoes. Simply
select the HSP size that matches your horseshoe size. Our plastic plate is available both as
a
fully closed version and as a grid plate, but it must be trimmed to fit.
Another option for closing the sole area when using padding material is MESH. Please note
that
not every version is compatible
with every type of padding material. The most suitable solution
therefore depends on the reason for closing the sole area and on the intended use of the
padding
material.
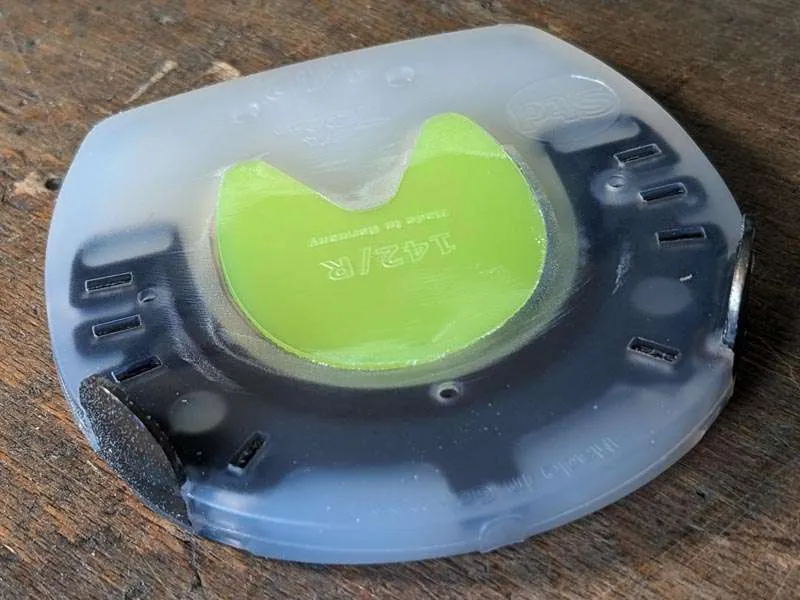
The yellow Hoof Sole Protector fitted inside the composite horseshoe.
Optional Grip Modifications
Adding Tread, Installing Spikes and Retrofitting Threaded
Inserts
Many of our models are available with a deeper tread pattern or with pre-installed threaded inserts for studs. However, there are situations where additional grip needs to be added afterwards. Below, we show you the different ways to modify the horseshoes for improved traction.
Horseshoe with Deeper Tread Pattern
Use your angle grinder with a coarse-grained grinding disk to make a profiled horseshoe from
a regular version without deeper tread pattern. Make sure the ground-off synthetic material
doesn't clog the nail holes.
For the Straight Bar horseshoes and the Full Branch Shoe, we advise against grinding a
profile
afterward.
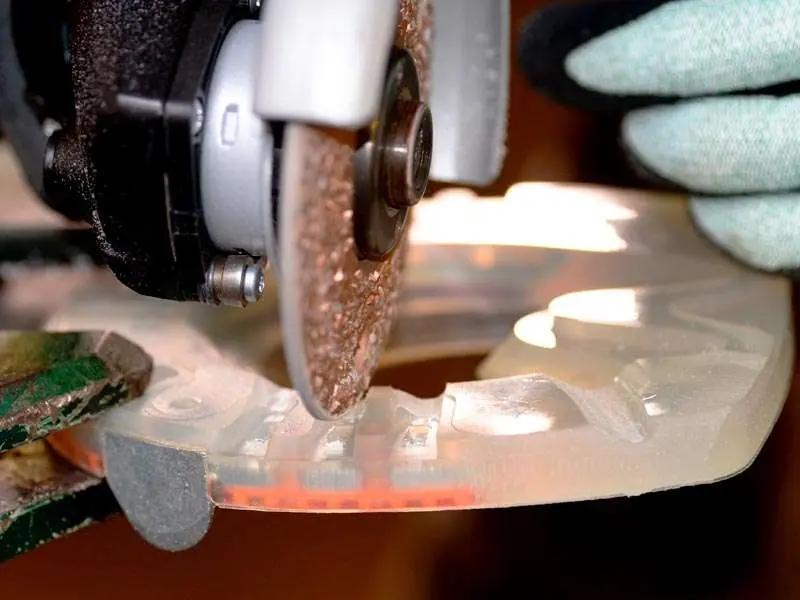
Grinding a deeper tread pattern into the plastic coating of the composite shoe.
Spikes – The Tungsten Pins of Alternative Hoof Protection
For additional grip, small spikes can be screwed into the
horseshoe.
They serve a similar purpose to the tungsten carbide pins used with steel shoes.
Please check the model-specific recommendations before using spikes, as some models are only
compatible with one of the two sizes (M or L).
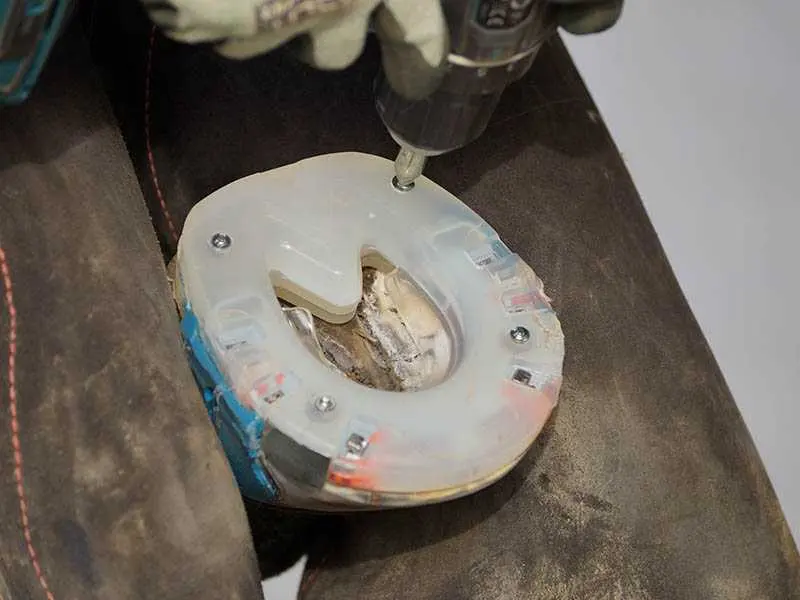
Installing a spike in a composite horseshoe
Retrofitting Threads Yourself
A drive-in stud nut can be fitted to most composite horseshoes, allowing the horseshoe to be used with anti-slip studs. However, a horseshoe modified in this way is not suitable for regularly installing and removing the studs.
Retrofitting a drive-in stud nut is not possible or not recommended for the following models:
- pure urethane shoes
- models with a more deeper tread
- Straight Bar models with a closed metal core
- Full Branch Shoe with a regular horseshoe branch
- pony horseshoes
- Heavy Duty Shoes
- open-toed shoes
The Full Branch Shoe is an exception. Unlike the other models listed above, it does not use a drive-in stud nut. Instead, as with a traditional horseshoe, a thread can be cut directly into the metal core. The horseshoe can then be fitted with the specially designed FBS studs. Please note that this solution is currently intended exclusively for permanent use of the studs.
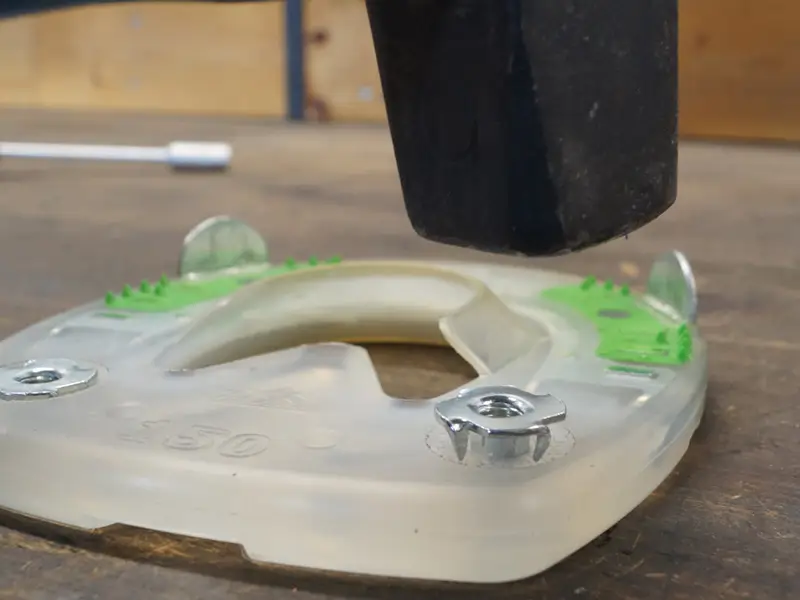
Installing drive-in stud nuts
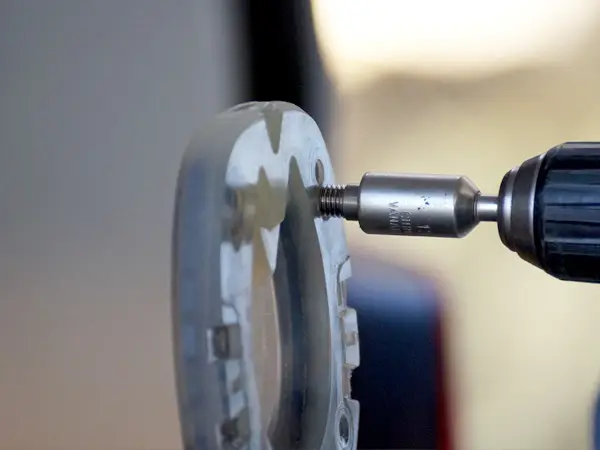
Cutting a thread for permanent stud use on the Full Branch Shoe.
Shoeing Composite and Pure Plastic Horseshoes — Further Information
The Appropriate Model
Above all, the question arises about the right model. In our range, you will find many different composite horseshoes with various additional features as well as pure plastic shoes.
The Right Horseshie Size
The first step is to find the right size and shape for each horse's hoof. On the 'Sizes and Shapes' page, you'll find a template as well as a table with the measurements of our horseshoes.
The Ideal Shoeing Method
The composite shoes can be applied either by nailing or gluing them to the hoof. They can also be used as cast shoes. There is a shoeing instruction available for all three of them.
Maximum Durability
The durability of the composite shoe is influenced by many factors. We have summarized the most important information regarding wear and longevity for you.
Latest Update: 2026-09-02