
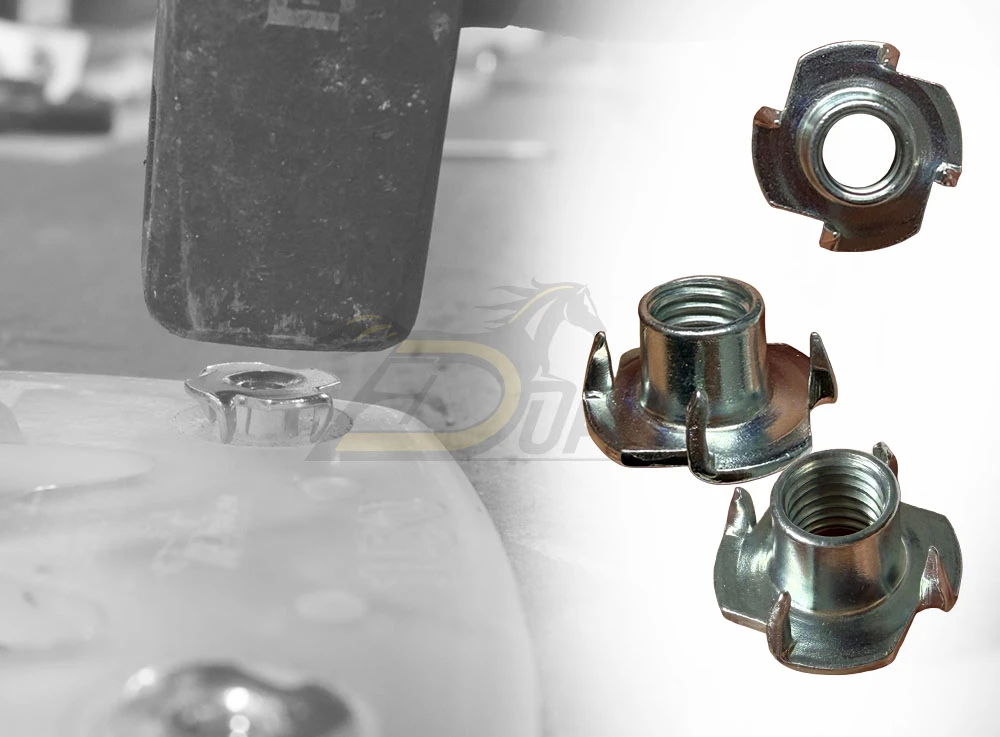
Stud Insert Nuts and Installation Accessories
Item No.: GS9
from 0,55 EUR
incl. 19 % VAT
-

- delivery time 3-5 Werktage (*)
Are you already benefitting from our commercial conditions? Please contact us!
Stud Insert Nuts – Retrofitting Horseshoes for Stud Use
Our range already includes more than 20 models, offering a wide selection for a variety of requirements. Even so, there are situations where no single horseshoe combines all the features you need.
For example, if you need a clipped horseshoe with a closed sole area and want to add studs for improved traction, you currently have two options:
- Choose a model with quarter clips and threaded inserts and add the Hoof Sole Protector to close the sole area.
- Alternatively, use a clipped horseshoe with closed sole area and retrofit the threaded inserts yourself.
Retrofitting Studs in the Heel Area
Manually retrofitting Stud Insert Nuts in the heel area gives you additional options for using studs. Please keep in mind, however, that the use of studs increases the risk of injury within the herd.
If the Stud Insert Nuts are not installed correctly or are positioned incorrectly, there is also a risk that they may be levered out of the horseshoe. You should therefore carefully weigh the pros and cons before deciding to retrofit a horseshoe for stud use. Depending on the intended use, a model with integrated threaded inserts may be the better option. In many cases, however, small Spikes already provide sufficient additional traction.
The requirements for optimal hoof protection are virtually unlimited. This makes it all the more important for us to provide you with as many options as possible, so you can find the best solution for each horse on site.
Tools and Accessories Required for Retrofitting Studs
- 2 stud insert drive-in nuts with with denticulation per horseshoe
- twist drill bit for wood and synthetic materials with a center point
- specially ground Forstner drill bit
- hammer
- cordless drill
- permanent marker
- suitable studs with disc or closure plug until the studs are permanently installed
- stud wrench

Incompatible Horseshoes
The Stud Insert Nuts are versatile and can be used with many of our horseshoes. Depending on the model, however, the shape of the metal core, a reinforced tread or simply the size of the horseshoe may prevent the drive-in nuts from being installed. The Stud Insert Nuts can therefore not be used with the following models:
- models with deeper tread pattern
- Straight Bar Shoes with a ring-shpaed metal core
- Full Branch Shoe
- pony horseshoes
- Heavy Duty Shoes
- open-toed horseshoes
Permanent Stud Use
Please note that horseshoes retrofitted with Stud Insert Nuts are not suitable for studs that are regularly screwed in and removed. You can, of course, protect the stud hole with stud blanks until winter conditions begin and then fit the stud once the ground conditions require it. The same applies in reverse toward the end of winter. However, the stud should not be screwed in only when needed and removed again afterwards, as repeated installation and removal can reduce the stability of the thdrive-in nut within the synthetic material.
Stud Insert Nuts for Synthetic and Composite Horseshoes

The Stud Insert Nuts are available in M8 The Stud Insert Nuts are available with M8 and M10 threads. For smaller horseshoe sizes in particular, however, we recommend the M8 version rather than M10. Our general recommendation is the 4mm M8 anti-skid stud with disc.

Only use our anti-skid studs with a disc on retrofitted horseshoes, and protect the Stud Insert Nuts with closure plugs whenever the studs are not in use.

Even if your horseshoes provide additional grip with Spikes and/or studs, they may still become slippery under certain conditions. Always adjust your speed and riding style to the ground conditions and your horse's sure-footedness.
Installing the Stud Insert Nuts
Only a few steps are required to install the drive-in nuts. Careful adjustment of the horseshoe, correct positioning of the Stud Insert Nuts and precise work are essential. This ensures that the drive-in nut is securely seated and provides a reliable hold for the stud.
Please note that any subsequent modification of our horseshoes is carried out at your own discretion and own responsibility.
Correct Position of the Stud Insert Nut
- Incorrect positioning can cause unwanted pressure on the hoof.
- The Stud Insert Nuts must be positioned in the heel area.
- The spike recesses in the horseshoe can be used as a guide for correct positioning.
- Depending on how the horseshoe has been adjusted, the correct position may differ from the spike recesses.
- Do not position the drive-in nuts too far outward or too close to the edge of the horseshoe.
Installing the Stud Insert Nut
- Follow our instructions for working with synthetic materials and wear suitable personal protective equipment .
- Check the tools before use and make sure the bit is securely fitted in the drill.
- Adjust the horseshoe to the hoof shape as usual.
- Determine and mark the position of the Stud Insert Nuts.
- Place the horseshoe on a stable surface for drilling and secure it to prevent it from slipping.
- Using the specially ground Forstner Drill Bit, drill a recess approximately 1–2 mm deep into the synthetic material on the hoof side of the horseshoe.
- Only use our specially ground Forstner Drill Bit to avoid drilling too deeply and compromising the secure fit of the drive-in nut.
- Using the twist drill bit, drill through from the hoof side to the ground side.
- We recommend using a wood twist drill bit with a center point, as this helps you start the hole more precisely and reduces the risk of the drill bit slipping.
- Insert the drive-in nut from the hoof side and drive it into place with a controlled hammer strike.
- Screw in the desired studs using the appropriate stud wrench.


Product Features
| General Information and Delivery Details | |
|---|---|
| Product | Stud Insert Nuts and installation accessories |
| Made in | Germany |
| Item Number | Stud Insert Nut M8: 002000 | M10: 002001 Specially Ground Forstner Drill Bit: M8-26mm: 042012 | M10-28mm: 042013 Twist Drill Bit for Wood and Synthetic Material: M8-10mm: 042014 | M10-12mm: 042015 |
| Packaging Unit | sold individually |
| Exchanges and Returns |
Under certain conditions, exchanges or returns are possible within 3 months within the European
Union
(EU). For returns from outside the EU, please contact our customer service team. Full details can be found under FAQ → Service & Conditions. |
| Function and Areas of Use | |
|---|---|
| Function | Retrofitting horseshoes for stud use, additional grip, winter horseshoeing, threaded insert for anti-skid studs with a disc |
| Compatible Horseshoes |
The Stud Insert Nuts can be used with the following horseshoes:
|
| Thread Size and Compatible Studs |
M8 and M10 Use only our 4mm and 6mm anti-skid studs with a disc. Studs without a disc and higher studs can impair the stability of the threaded insert in the synthetic material. This may cause unwanted pressure on the hoof. |
| Application Instructions |
The use of Stud Insert Nuts with anti-skid studs is at your own discretion and should be adapted
to the ground conditions, riding discipline and safety within the herd. Horseshoes retrofitted with Stud Insert Nuts are not suitable for regular stud changes. Use hex socket set screws or closure plugs until the studs are installed permanently. These keep the thread clean, make it easier to screw in the studs later and help maintain the stability of the drive-in nut. If dirt is repeatedly pressed into the threaded hole, this may cause unwanted pressure on the hoof. The same applies if the studs are repeatedly screwed in and removed contrary to our recommendation. |
| Safety Information | |
|---|---|
| Safety Information Online | Please also follow the additional information on stud use in our safety instructions. You can find these online under FAQ → Safety Information. |
| Safety Information as a PDF Download | PDF Download |
| Risk of Injury |
The use of studs increases the risk of injury. Always coordinate the use of studs with the
stable owner and, where applicable, the other horse owners. The use of studs and their
monitoring
during use are the responsibility of the farrier and horse owner. We accept no liability for any damage caused by studs or incorrectly installed drive-in nuts No matter how carefully a horseshoe is retrofitted, a horse may still slip. Always adjust your speed accordingly. Regularly check the horseshoe, any quarter clips and the fit of the studs throughout the shoeing period. A crooked stud is an indication that the Stud Insert Nut is no longer correctly aligned in the synthetic coating. |
| Drive-in Nuts Embedded in the Plastic Coating | Repeatedly removing and reinstalling the studs, as well as dirt collecting in the Stud Insert Nuts, can impair the stability of the threaded inserts. Whenever no studs are installed, always protect the stud holes with stud blanks. Avoid repeated stud changes and use only our studs with a disc for optimal pressure distribution. |