

Hoof Repair with Equilox Adhesive Horn Substitute
A horse's hooves are exposed to immense stress every day. How quickly horn cracks occur in everyday horse life depends on various factors. Poor horn quality, thin hoof wall , incorrect loading, too long shoeing intervals or the influence of bacteria — there are many possible causes. Even if a shoe is torn off, this often results in major damage to the hoof wall. In many cases this is not a problem, but sometimes the damage is so extensive that it is necessary to repair the hoof for the next shoeing so that the shoe can be nailed or glued at all.
The Equilox Adhesive Hoof Repair System is suitable for repairing and filling horn splits and cracks. Experience shows that Equilox can be combined with both nail-on and glue-on shoes . Equilox writes on their website: "Only Equilox is strong enough to stand up to everyday wear and tear, yet remain flexible for easy filing and shaping — even nailing — to handle all your repair jobs, from patching quarter cracks, to major hoof wall reconstruction."
Testimonial on Adhesive Hoof Repair and Synthetic Horse Shoes — Photos
Our Swiss partners Patrik and Linda from Brunner Hufbeschlag GmbH told us about their experiences with Equilox. When we received their experience report, we decided without further ado to include the Equilox Adhesive Horn Substitute in our range.
From Practice for Practice — Brunner Hufbeschlag about Equilox
"We have been working with this product for a long time. It has proven its worth, is easy to use, cures quickly (so you don't have to wait forever) and is easy to work with / nail / glue on. The cartridge we use also has the advantage that there is no need for a mixing nozzle , where (as with silicone , for example) half of the product is lost. In most cases, the Equilox also lasts for more than one shoeing cycle and can simply be processed like the healthy horn for the next shoeing.
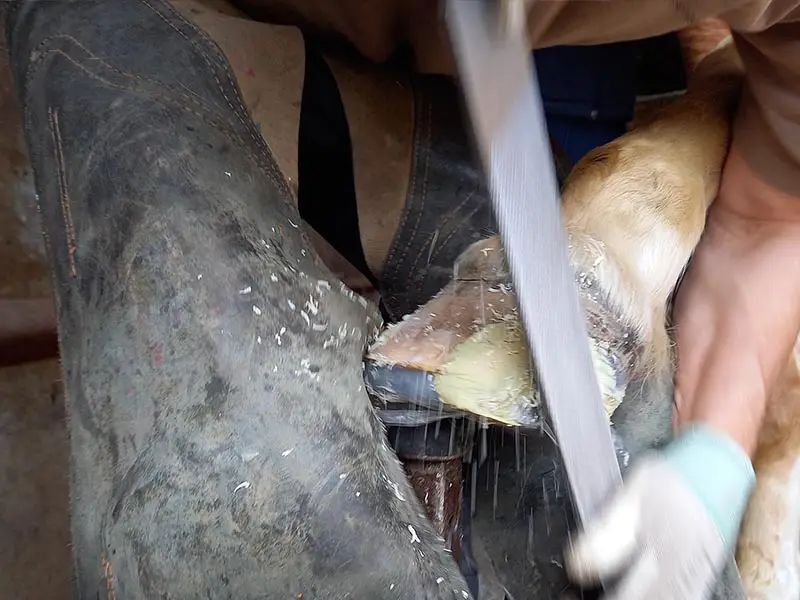
The Haflinger's hoof had broken off so badly because the nailed shoe was repeatedly torn off and therefore there was less and less substance. The farrier who had nailed the shoe doesn't do glue-on shoes and asked us to take over the horse.
Depending on the hoof situation, we always look for the easiest and quickest way to build up the hoof. In case of the Haflinger, we used the horseshoe as a base and shape for the Equilox build-up. We wrapped the shoe in film to prevent the Equilox from running into the nail holes. After curing, we then worked on the hoof as normal and glued on the horseshoe.
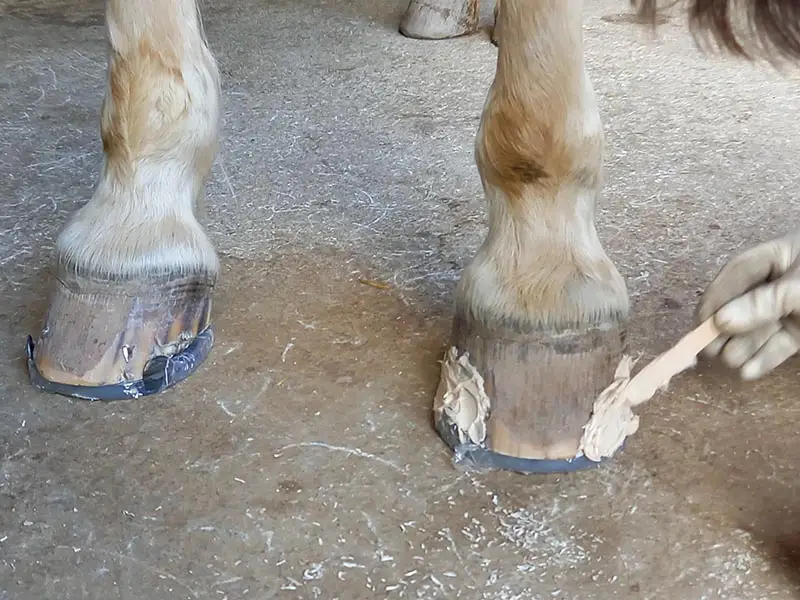


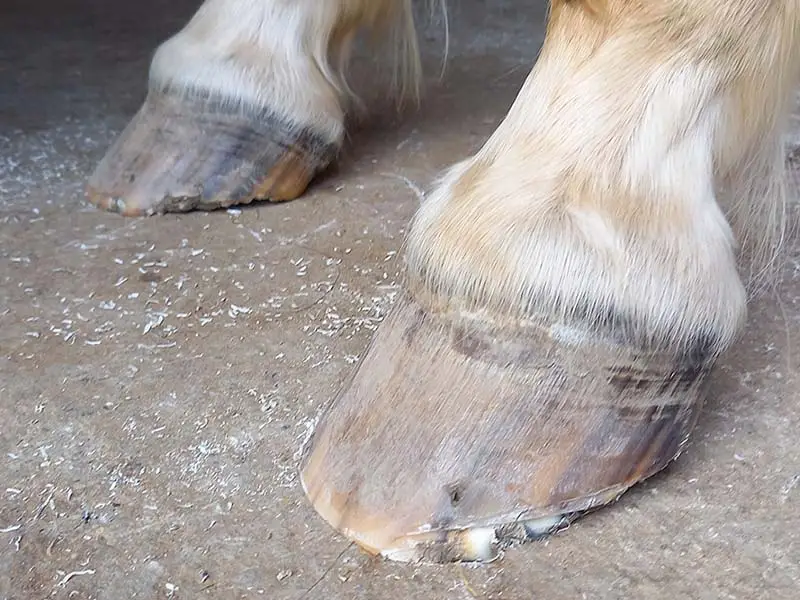
We currently have another horse in our customer base that needed to be rebuilt with Equilox. We also took on this horse with poor horn quality, as can be seen in the photos. We did the first shoeing as normal. Last week, however, the horn broke at the point where the horse had a horizontal crack in the horn. We then cut away all the brittle and rotten areas and again used the shoe as the basis for building up the horn with Equilox. To do this, we first nailed the horseshoe on with the two toe nails and placed the remaining nails after the horn replacement had cured."
The hooves when taken over by Patrik and Linda from Brunner Hufbeschlag.

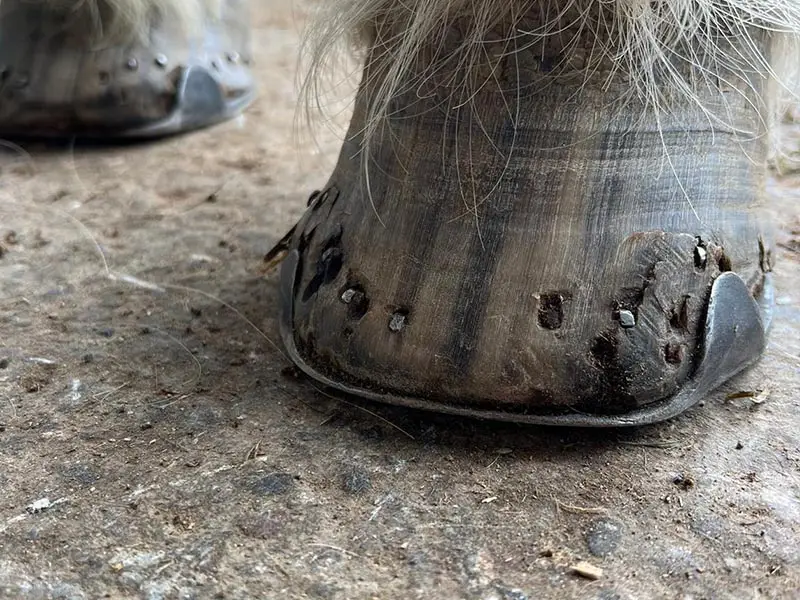
The first shoeing period with composite horseshoes .
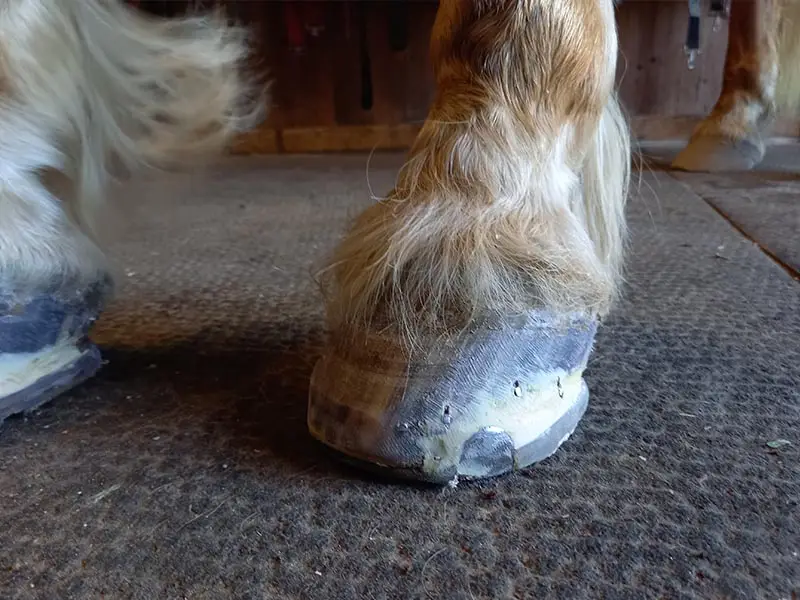
The second shoeing period - this time with a hoof repair with Equilox.
General Application and Safety Instructions — Video
Please observe our safety instructions when working with our shoes and accessory products. Wear gloves when working with Equilox and make sure that there are no infections before applying the horn substitute to the hoof. Applying the compound directly over an infections could lead to further complications . Instead, consult your vet to initiate treatment and wait until the infection has completely cleared before starting the hoof repair. Equilox should only be used by professionals, i.e. farriers / hoof trimmers and veterinarians who are familiar with the product.
Step-by-Step Guide
Here's a link to the manufacturer's official step-by-step instructions.
The Swiss testimonial has shown that there are sometimes many ways to achieve a goal. The following general steps are therefore not set in stone.
How to Prepare the Hoof
- First provide the required material and ensure that the workplace is clean, dry and, above all, well ventilated.
- Properly trim the hoof as you would trim a healthy hoof.
- Make sure to cut away or rasp away loose or contaminated horn material (if possible). If an infection is present, you should discuss further treatment with your vet.
- Check the hoof again for cleanliness, remove the periople layer in the area to be treated and make sure that there are no hairs in the way. The hoof should be dry before applying Equilox.
How to Prepare the Adhesive Hoof Repair System
In the following, we would like to discuss the application with the single-use can.
Put on gloves before working with Equilox.
- Open the container. Inside you will find an accelerator mass in a bag/ampoule .
- Remove the ampoule from the can and knead the accelerator mixture thoroughly before opening the bag and pouring the contents into the can.
- Mix the two components for at least 1 to 1½ minutes. Scrape the edges and bottom of the can thoroughly while mixing to create a homogeneous mass.
- The horn substitute is now ready for use. To achieve maximum adhesion, the freshly mixed Equilox horn substitute should be applied to the hoof wall as soon as possible after mixing.
How To Apply Equilox to the Hoof
Make sure again that no hair can be worked in. Depending on the area you are working in, it may be useful to cover the coronary band with some adhesive tape to prevent the horn substitute from being applied in this area.
- Apply Equilox to the clean, dry hoof.
- Place a layer of film over the area and model the horn substitute.
- Wrap the hoof with film.
- Allow the horn substitute to cure in accordance with the manufacturer's instructions and the product variant used.
- Remove the film.
- Equilox can now be treated like normal horn. Check the repaired area of the hoof and make minor adjustments with the hoof rasp if necessary.
- You can then nail or glue as usual. For adhesive shoeing, carry out the usual preparations on the hoof in the repaired area as well.
Seal all materials in the can and dispose of them properly.
Horn Cracks
If you are interested in using Equilox for larger horn cracks, take a look at the manufacturer's official step-by-step guide. There is also a YouTube video by Equilox on the subject of horn cracks.
In addition to repairing the horn cracks, it is of course important to investigate the cause. As already mentioned, the causes of horn cracks can be manifold. In our opinion, a close look at the type of horseshoe and the shoeing interval, the way the horse is kept (stable hygiene) and the movement mechanics of the horse is essential in order to avoid further horn cracks as far as possible. If you have a horse that generally has thin hoof walls and poor horn quality, you may be able to help with appropriate hoof care products and adapted hoof trimming or shoeing — shorter shoeing intervals, perhaps gluing instead of nailing. There are many possibilities. Sometimes, of course, it is an unfortunate combination that is difficult to influence.
Product Features
| General Data and Delivery Information | |
|---|---|
| Item | Equilox Hoof Repair Material - Single Use Sysem |
| Brand | Equilox International, Inc. |
| Item Number |
PEHEH2 — Equilox Adhesive Hoof Repair System — light 2oz PEHES2 — Equilox Adhesive Hoof Repair System — black 2oz |
| Color | black and light |
| Package Unit | one can - 2 ounce (approx. 57g) |
| Exchange and Returns |
Possible within 1 month under certain conditions within the
European Union (EU). For returns outside the EU, please contact our customer service. All details can be found in the section FAQ → Service & Conditions. |
| Delivery Restrictions |
Outside the European Union (EU), delivery is currently only possible to
Switzerland
and Norway. Delivery restrictions also apply to certain countries within the EU. If shipping to your country is not possible, this will be indicated accordingly in the shopping cart. The order cannot be completed as long as the product remains in the cart. You will be notified again in the cart. Corresponding notices can also be found on the product image. As international regulations are constantly changing, we refrain from listing them and ask for your understanding. |
| Function, Applications and Accessories | |
|---|---|
| Function | hoof repair, hoof reconstruction, horn replacement to fill horn gaps and cracks, horn build-up |
| Season | Equilox can generally be used year-round; however, curing time may vary depending
on temperature. Please observe the temperature specifications for safe storage of Equilox. |
| Curing Time | 4–7 minutes at room temperature |
| Step-by-Step Guide | We are happy to provide the official manufacturer’s step-by-step guide. |
| Storage | Keep out of reach of children. For maximum shelf life: storage temperature between 4°C and 10°C (40°F - 50°F). Equilox should be protected from direct sunlight and intense heat and kept away from frost. Keep container tightly closed. Fire hazard: Keep away from heat, sparks, open flames, and other ignition sources . |
| Disposal | Dispose of contents and container in accordance with regulations for hazardous waste or packaging waste. |
| Safety Instructions | |
|---|---|
| Safety Instructions for Products | Our safety instructions can be found online under FAQ →
Safety Instructions. PDF Download |
| Health Risks from Equilox |
|
| Working with Equilox |
|
| Safety data sheet Equilox | Read the safety data sheet before using this product. |
| Ingredients | Cyclohexyl, Methacrylate, Methyl-2-Methyl-2-Propenoate, 2-Methyl Propenoic Acid, Diispropanol P-Toluidine, Dimethylaniline; Dibutyl Phthalate and Diglycidyl Ether of Bisphenol A. |
| First Aid Measures |
|


 - Hoof Repair - 250cc Cartridge - glue-u")


Manufacturer in accordance with the Regulation (EU) 2023/988 on General Product Safety (GPSR)
Manufacturer in accordance with the Regulation (EU) 2023/988 on General Product Safety (GPSR)
Name: Equilox InternationalPhysical Address: 110 NE 2nd. Street
City: Pine Island, MN 55963
Country: United States of America
Responsible Person in accordance with the Regulation (EU) 2023/988 on General Product Safety (GPSR)
Name: Blacksmith SrlElectronic Address: info@blacksmithitalia.it
Physical Address: Via Monaco, 16
ZIP Code: 24040
City: Ciserano (BG)
Country: Italia