Duplo Glue-On Horseshoes – Guide, Tips & Product Recommendations
Glue-on horseshoes – also known as nailless horseshoes – are becoming increasingly popular in modern hoof care. But how exactly do you glue on composite horseshoes so they stay secure? What’s the best way to prepare the hoof for gluing, and how do you apply the adhesive tabs correctly? In this article, we explain how to glue horseshoes step by step, which products work best, and what you should watch out for to prevent them from coming off.
From professional hoof trimming and proper preparation of the hoof to the actual application of glue-on horseshoes – meaning the attachment of adhesive tabs to the composite horseshoe using plastic welding – this guide covers everything that matters for achieving maximum durability and stability.
Optimal Durability and Stability of Glue-On Horseshoes
This guide on how to glue composite and urethane horseshoes brings us closer to our shared goal: achieving the best possible durability and stability for your horse’s glue-on horseshoes while also ensuring the safety of everyone involved. That’s why essential safety instructions for gluing are, of course, included.
Naturally, this guide is not exhaustive. It’s designed to give you a solid foundation, but it does not replace the additional information provided by the manufacturers of the gluing accessories or the expertise required for proper hoof trimming. Please also read the product descriptions of the materials you are using carefully. They offer valuable tips and tricks to help you apply glue-on horseshoes more safely, efficiently, and durably.
The Ideal Guide for Gluing – The Right Format for Everyone
This page provides you with the detailed guide on how to glue horseshoes. If you prefer a more compact version, use our short version as a PDF download. And if you prefer to work with a learning by doing approach, we recommend our gluing courses. These courses explain everything in detail – from proper hoof preparation to gluing on composite horseshoes. Of course, you’ll also get the chance to apply glue-on horseshoes yourself on a training hoof.
Take part in a gluing course (currently in German Language) Download the gluing guideSafety Instructions for Gluing
Please always observe our general safety instructions when using our products. These apply to both the farrier and the rider or horse owner during the horseshoeing period. When working with glue-on horseshoes, make sure to follow all safety instructions related to the adhesive used. Wear appropriate Personal Protective Equipment" (PPE) and ensure adequate ventilation.
BEFORE GLUING: Two Key Questions on the Way to the Ideal Glue-On Solution
Our goal is to offer individual solutions for every hoof – whether barefoot, plastic, composite, or
steel shoes – because every horse needs a solution tailored to its needs. Whether you choose direct or
indirect
gluing
, or whether the glue-on shoe should provide more or less stability: there is no one-size-fits-all
solution.
That’s why we offer a wide range of our own products – and even a few carefully selected third-party
items that we confidently recommend as suitable glue-on horseshoes.
So before gluing, the first important questions are: how much stability should the base plate provide,
and which gluing system is right for your horse?
The amount of stability the horseshoe should provide is always a central factor – whether you're using nailed or glue-on horseshoes. The question is whether a pure plastic horseshoe, a composite horseshoe with a strong steel core, a lightweight aluminum core with integrated glue-on cuffs (like GluShu), or a dual-material urethane horseshoe with a stable plastic core (such as the blueline® evo!) is the right choice.
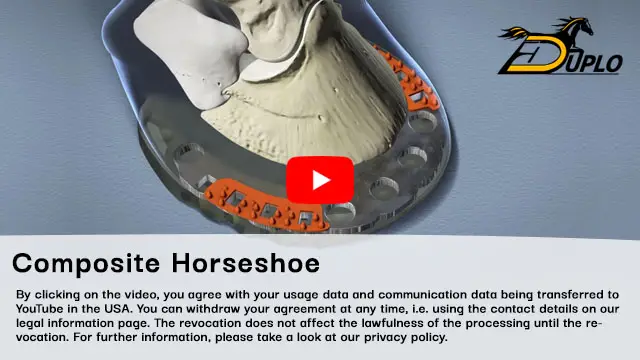
The Advantages of a Composite Horseshoe as a Glue-On Option for Your Horse
If you're unsure which solution is best for your (client’s) horse, take a look at our animated video. It clearly illustrates the benefits of a composite horseshoe like ours: it combines a strong steel core to support the bony structures with flexible plastic in the area of the hoof’s softer structures.
If you decide on a composite horseshoe with a solid steel core as the base for your horse’s glue-on horseshoes, the next question is which additional features make the most sense. Quarter clips provide extra stability by helping prevent the shoe from twisting on the hoof during the regular shoeing period. A model with reinforced tread offers improved grip . Integrated stud holes allow you to insert studs if needed, while a model with a closed sole surface gives you the option to combine the glue-on shoe with padding material.
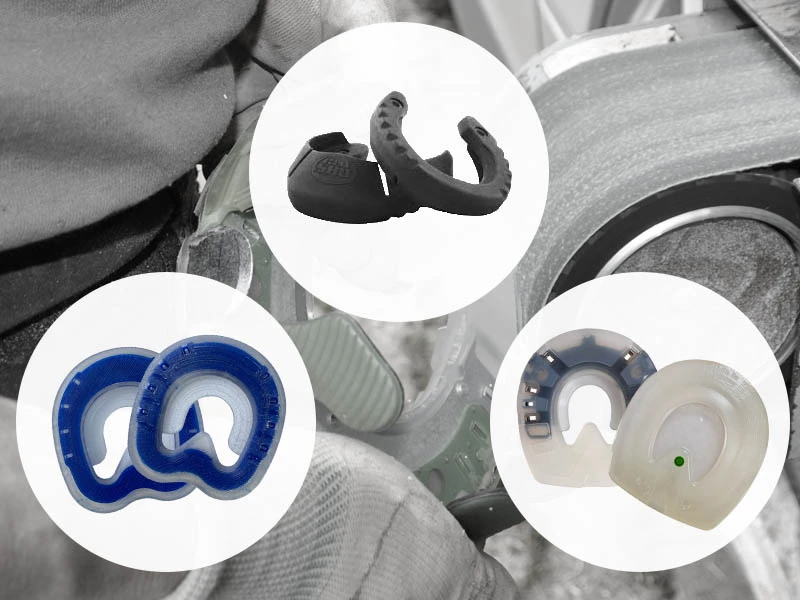
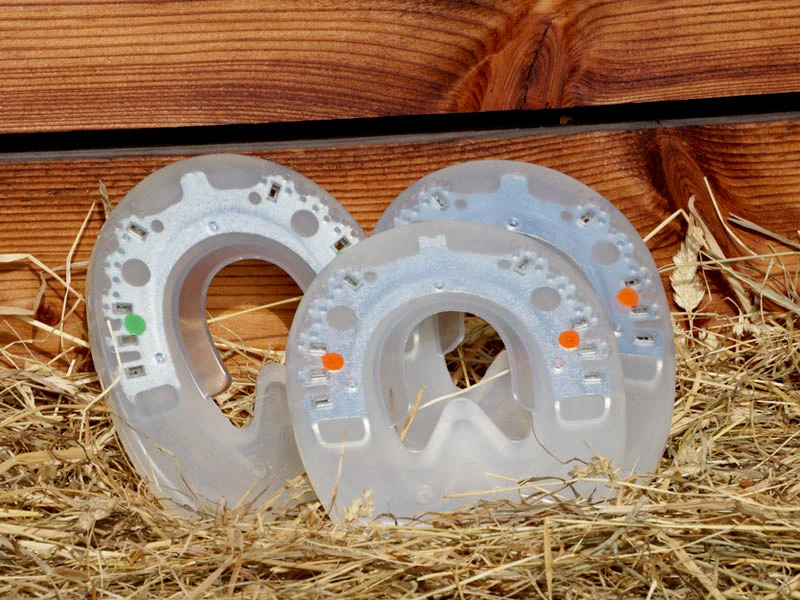
Composite Horseshoes – Explained Visually
Recommendations: The Best Base Models for Glue-On Horseshoes
You have the choice: with the exception of the special model Arizona
, you can use any of our horseshoes as the
base plate for your horse’s glue-on shoes.
While technically all models (except that one) are suitable as a base plate for gluing, we’d like to
highlight
three horseshoes that are especially well-suited for use as a glue-on shoe.
Pure Plastic Horseshoes
Our pure plastic horseshoes combine shock absorption , flexibility, and reliable hoof protection.
The 'Base Plate' is available in sizes from 114 mm to 146 mm. It’s a plastic horseshoe with a closed sole area and no nailing slots. This model is our top recommendation if you're looking for a glue-on horseshoe that is as close to barefoot as possible – which is exactly why we named it that way.
Buy Base PlateFor larger hooves, check out the Classic ; for smaller hooves, we recommend the pony horseshoe.
Buy Duplo Classic Buy Pony HorseshoeThe Nailless - Un-Clipped Composite Horseshoe
The Nailless is a composite horseshoe without quarter clips. It features a strong steel core combined with a shock-absorbing plastic outer layer.
What sets the Nailless apart from other composite horseshoes of this type is that
it does not include an integrated knob
arrays
, but only a soft knob profile that
results from production.
The colored knob inserts in other models helps prevent twisting when the shoe is nailed and lacks
quarter
clips. However, for glue-on horseshoes, it has proven more effective to use a model without colored knob
insert.
The Basic - Clipped and Profiled Composite Shoe

The Basic model with quarter clips and tread is a cost-effective alternative – partly because its metal parts are not galvanized and it does not include a knob insert.
This makes it not only a budget-friendly option for nailed horseshoes, but also a solid choice if you’re looking for a stable glue-on composite shoe with quarter clips.
The Basic is currently available in both round and oval shapes for hoof sizes ranging from 114 mm to 146 mm.
Buy Duplo BasicThe Right Glue-On Tab for the Ideal Glue-On Shoe
Once you’ve selected the most suitable base plate for your glue-on horseshoes, the next step is choosing the optimal glue-on tab. We’d like to offer a general recommendation – not as a fixed rule, but as a helpful guideline to support you in finding the ideal glue-on solution for your horse.
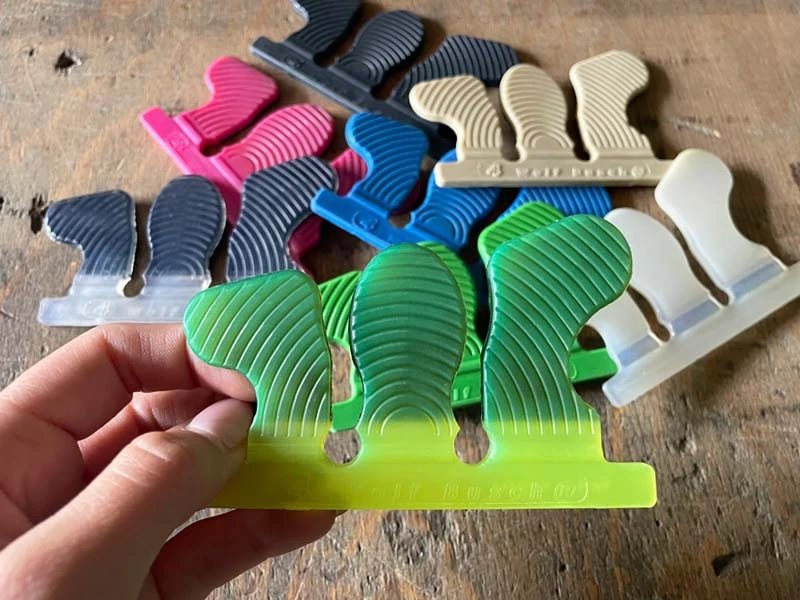
In our product range , you’ll find both glue-on collars (Pro and Easy) – one needed per hoof – and the popular Wolf Busch® glue-on tabs, which are used as a pair per hoof.
| Types and Sizes of Composites and Pure Urethane Shoes |
Glue-On Cuffs Pro and Easy Buy Glue-On Collars Pro / Easy |
Wolf Busch® Glue-On Tabs Buy Glue-On Tabs Buy Basic Tabs |
|---|---|---|
| Round and oval Horseshoes | Well suited | Well suited |
| STS or open-toed horseshoes | The glue-on collar must be split in the toe area. | Well suited |
| Clipped Horseshoes | Split the glue-on collar into multiple sections and place the segments in front of and behind the clips. | Trim the largest tab and place it in front of the quarter clips. Position the remaining tabs behind the clips. |
| Pony Horseshoes from 50 mm to 70 mm | Manual adjustments to length and height required |
Pony shoes 50–70 mm: Glue-on Tab size 1 Pony shoes 70–90 mm: Glue-on Tab size 2 |
| Horseshoes from size 90 mm to 162 mm | The glue-on colalr comes in one universal size; individual adjustments to tab height and length are usually required. |
Horseshoe Size 90–114 mm: Glue-on Tab size 3 Horseshoe Size 114–134 mm: Glue-on Tab size 4 Horseshoe Size 134–162 mm: Glue-on Tab size 5 |
| Horseshoes for larger hooves, including draft horse hooves | In this case, it is usually necessary to combine two glue-on collars to create a custom fit for the hoof. | Hrosehoe Size 162–198 mm: Glue-on Tab size 6 |
DURING GLUING: How to Glue Duplo Horseshoes and Safety Instructions
The following gluing instructions apply to our plastic horseshoes, composite horseshoes, and the blueline® evo!. For the latter, there are a few additional aspects to consider, which you can find in the product description.
For the GluShu, which is glued to the hoof using a two-component adhesive, there is a separate gluing guide from Glue-U, which we have linked directly on the product page.
Preparations Before Gluing
Once you’ve selected the right horseshoe (in terms of hardness, shape, and size), the appropriate glue-on tab or glue-on collar, and the adhesive, you’re ready to move step by step toward a safe and secure glue-on application.
Barefoot Trimming
Proper trimming of the hoof follows the same basic principles as before any other type of horseshoeing and must be carried out professionally. Expert hoof trimming is essential when it comes to gluing on horseshoes.
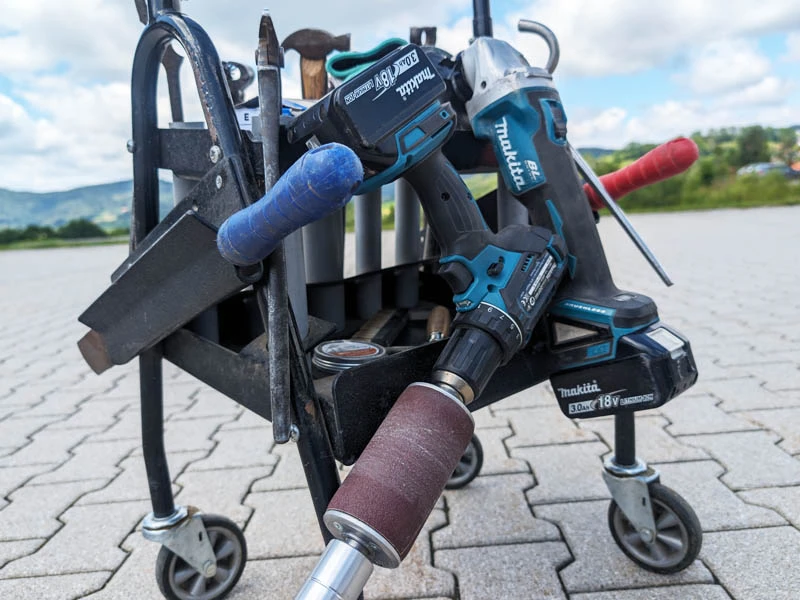
Of course, you’ll also find all the hoof trimming tools you need for optimal preparation in our online shop – from rasps to the Hoof Buffer, which is especially popular for glue-on applications.
Adjusting the Horseshoe – Customization
Adjust the horsehoe to the shape of the hoof, and leave about 1 mm of material extending beyond the hoof in the area where the glue-on tab or glue-on collar will be attached. This extra material is needed for the plastic weld when attaching the tabs to the shoe. For more information on how to properly fit the shoe to the horse’s hoof, see our FAQ → Adjustment to the Hoof.
Safety Instructions for Gluing – Working with Plastic
At this point, we strongly encourage you to read our safety instructions. Not all plastic is the same. Our products are made from chemically safe and certified synthetic materials. However, when working with plastic, there are still important health and safety measures to follow. Please be sure to observe our official safety instructions whenever working with our products.
Removing the Knobs for Better Durability of the Glue-On Shoe
A small but important step to ensure an optimal form fit between the shoe and the hoof – and to maximize the durability of the glue-on horseshoes: before attaching the glue-on tabs to the shoe, remove all knobs – both the integrated colored knob inserts and the softer production-related knob profiles.
The reason for this step is that otherwise, compression of the tabs can occur over time. If the knobs are not fully embedded during the gluing process, they may continue to press into the hoof wall afterward, causing the shoe to shift upward and the tabs to become strained. This can reduce the overall durability of the glue-on horseshoe.
A Tip for Choosing the Ideal Glue-On Shoe
As mentioned above, here’s another helpful tip when selecting the ideal model for your glue-on horseshoe: The more affordable 'Basic', the 'Base Plate', the 'Pony' horseshoes, and the open-toe models are all completely knob-free. That means this step can be skipped when preparing the glue-on shoe for your horse.
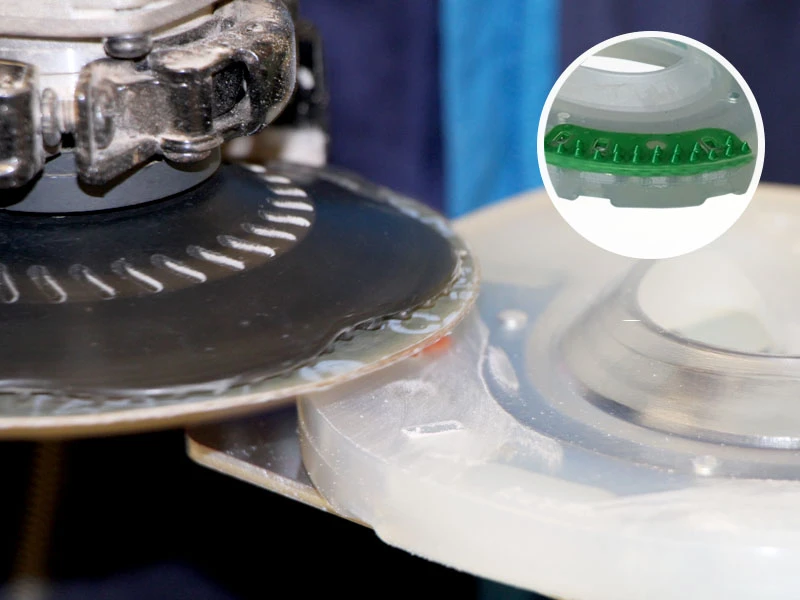
Plastic Welding – Attaching the Glue-On Tabs to the Horseshoe
For nailless hoof protection, not only professional barefoot trimming is essential – correct attachment of the glue-on tabs using plastic welding is just as important. For strong and consistent weld seams, we recommend using our welding devices. Both the Standard and Mini welding device come with a reduction nozzle compatible with the Steinel HeatMatic 1920 E heat gun.
Using a reduction nozzle is important to avoid injury from the hot air stream and to prevent heat from affecting the wrong parts of the glue-on horseshoe. With Wolf Busch® tabs in particular, make sure that no hot air is directed onto the inner side of the glue-on tab. When attaching the tabs, keep the heat gun temperature between 550 °C (1022 °F) and a maximum of 630 °C (1166 °F).
Safety Instructions for Gluing – Plastic Welding
At this point, we’d like to remind you once again of our official safety instructions. Please follow all listed precautions when plastic welding and handling heated plastic materials. Ensure proper ventilation, wear appropriate personal protective equipment (PPE), and avoid burning the plastic to prevent inhalation of fumes. Also, make sure to observe the safety guidelines provided by the manufacturer of your heat gun.
Step by Step to a Strong Weld Seam: How to Attach Glue-On Tabs Correctly
-
Mark the correct position for the glue-on cuff or for the left and right glue-on tab on the
horseshoe.
- For Wolf Busch® tabs, the smooth black side faces the hoof wall .
- For the Wolf Busch® Basic tab, the rough white-coated side faces the hoof wall.
- For the Pro glue-on collar, the correct orientation is determined by the angle of the tabs.
- For the Easy glue-on collar, the side labeled 'made in Germany' faces the hoof wall.
- Gently preheat the starting area of the weld seam until the plastic begins to shine.
- Whether you're working with or without a welding device: make sure the glue-on collar or tab does not extend into the tread of the horsehoeor sticks out beyond the ground-facing edge. If using our welding device, choose the appropriate spacer plate for the components. If using a different setup, ensure correct positioning.
- Slowly but evenly roll the horseshoe over the glue-on collar or tab. Depending on the type of glue-on component (soft / regular / with or without color additive / Basic tab), you may need to adjust the rolling speed and the temperature of the heat gun individually.
- Clearly define the start and end point of the weld seam by applying slightly more pressure at those points during welding.
- A thin, glassy bead along the entire length of the weld seam should be visible. This indicates proper fusion and ensures long-lasting durability of the glue-on horseshoe.
- Once the weld seams have cooled, we recommend performing a strength test. Pull on the tabs with full force. Don’t worry – you can’t pull too hard. The forces acting on the glue-on horseshoe later on the horse’s hoof will be much greater!
- Important: Do not cool the weld seams with cold water, as this can make the plastic brittle.
Final Preparations Before Gluing the Horseshoe to the Hoof
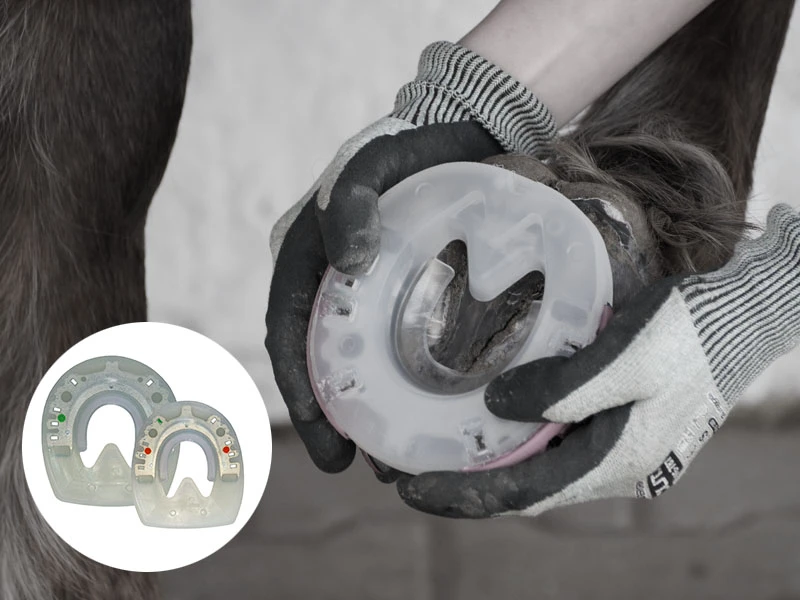
Checking the Fit of the Glue-On Shoe
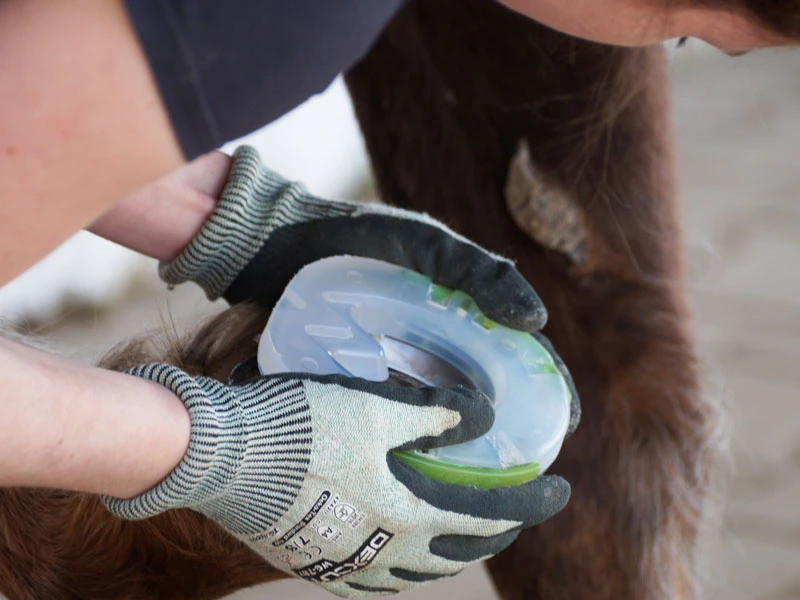
Slide the glue-on shoe onto the hoof from toe to heel. If necessary, flare the tabs slightly outward. The front edge of the glue-on shoe should no longer be visible from above; from below, the toe should be barely – or just not – visible. The glue-on shoe should sit firmly enough that you can fine-tune its position on the hoof.
Be sure to also check the height of the glue-on tabs. If the gluing tabs are placed not only on the horn but also on the coronary band , the glued connection becomes unstable. This can happen either because the tabs are too big or if they are placed at the wrong place on the hoof.
Final Adjustments to the Glue-On Shoe

Slightly round off the weld seams on the ground-facing side of the glue-on shoe.
Add a bevel at the heels (on the hoof-facing side) to make it harder for the glue-on horseshoe to get caught and pulled off.
If necessary, add a Toe Rocker.
Remove any sanding dust from the tabs after adjustment.
More details on these adjustments can be found under FAQ → Hoof Adjustment.
Preparing the Hoof Correctly
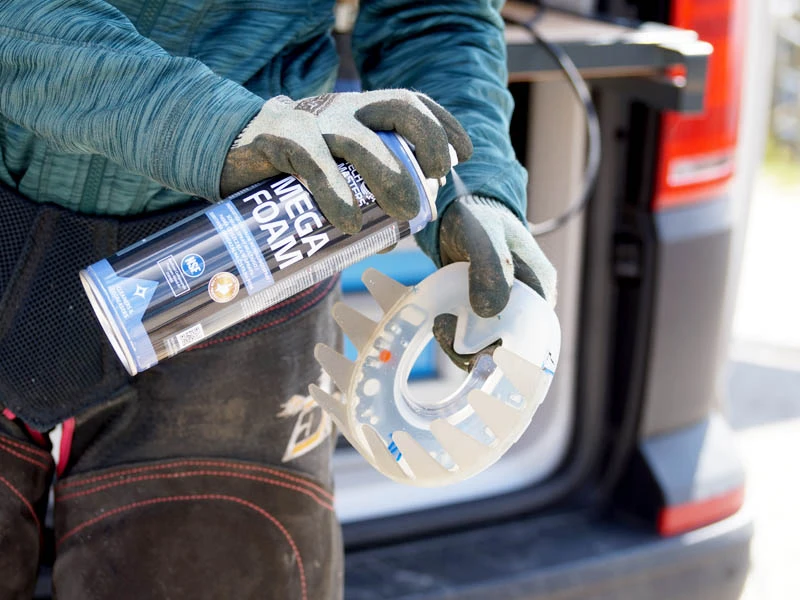
Roughen the hoof wall. For this purpose, use a sanding block (with Grit 80–120) or the Hoof Buffer.
To degrease the roughened hoof wall below the coronay band and the inner side of the glue-on tabs, we recommend using a degreaser like MEGA FOAM. Let the foam cleaner sit for about 30 seconds, then wipe it off thoroughly using a lint-free cloth. Alternatively, you may use 99% isopropyl alcohol. We do not advise using brake cleaner. Do not touch the degreased areas after cleaning to avoid recontamination with grease.
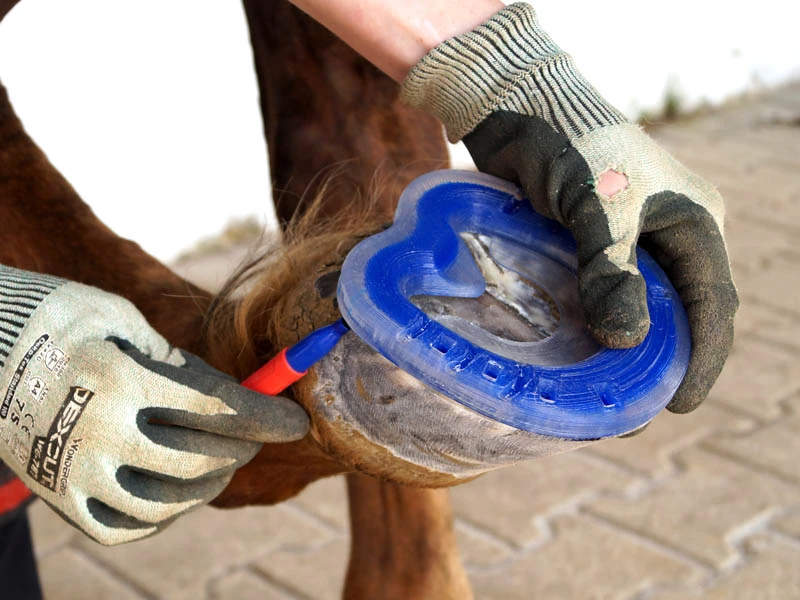
Gluing and Sealing – How to Properly Glue the Duplo Horseshoe
When choosing the right adhesive, make sure to consider the ambient temperature – further down, you'll find helpful information on gluing in summer and winter conditions. As we all know, a picture is worth a thousand words, and a video tutorial can often explain more clearly than text. That’s why we’re linking to our official gluing guide using the Wolf Busch® glue-on tabs as an example.
Gluing – But How?
Ideally, have a second person lift the opposite hoof to help the horse remain calm and steady.
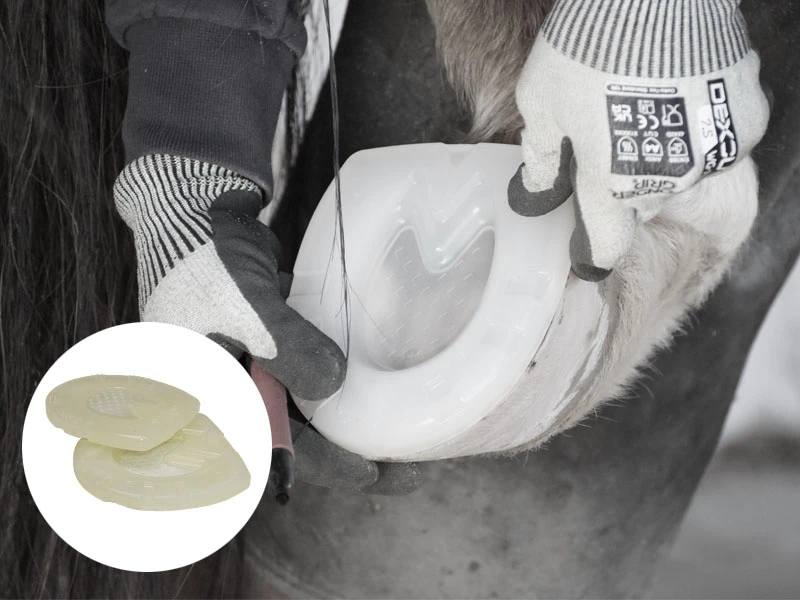
Now glue the tabs on the hoof wall one at a time: flare the tab outward, outline it with adhesive, and apply a cross and four dots inside. Press the tab evenly from bottom to top using two fingers for about 10 to 15 seconds.
We recommend gluing the first two tabs while the hoof is lifted. Then lower the hoof and immediately continue gluing the remaining tabs while the hoof is on the ground.
Finally, seal the upper edge of each tab with a small amount of adhesive.
The Wolf Busch® Glue-On Tab
Glue Not Curing Fast Enough?
If the horse has trouble standing still for long periods or the adhesive takes too long to cure, use the Pre Fix Activator. With just one simple additional step, it significantly speeds up the bonding process on the hoof.
Buy Pre Fix ActivatorAFTER GLUING: Removing a Glue-On Horseshoe
Once the gluing period has ended, the next challenge is to remove the glue-on horseshoe carefully. And 'carefully' applies in two ways: First, it’s important not to damage the hoof wall. Second, the glue-on shoe can only be reused for another shoeing cycle if the inner layer of the tabs remains intact.
Hoof Knife, Pliers & More
The right method for removing a glue-on horseshoe depends, among other things, on the condition of the hoof.
In principle, the glue-on shoe can be removed using pliers: grip the tab at the top and gently pull it away from the hoof. While this method is quick and easy, it carries a higher risk of damaging the hoof wall.
A more hoof-friendly option is to use a hoof knife to cut the glue-on cuff or tab downward, from top to bottom. Another simple, but more time-consuming method is to rasp off the glue-on tab or collar.
Reusability of the Glue-On Horseshoe
Whether a glue-on horseshoe can be reused depends on several factors. You’ll find more details – and additional gluing tips – in the product description of the popular Wolf Busch® glue-on tabs.
When it comes to reusability, there are some differences between the Duplo composite horseshoes and the blueline® evo!. Details about the blueline® evo! can be found in its product description.
Seasonal Differences When Gluing Duplo Hoof Protection in Summer and Winter
One important factor when gluing horseshoes to the hoof – and when choosing the right adhesive, the right
glue-on tabs
or collars, and the ideal base plate – is the time of year. Cold winter months bring different challenges
for
glue-on horseshoes than dry summer conditions.
In our product range, you’ll find both glue-on collars (Pro and Easy), which are used
one per hoof, and the popular Wolf Busch® glue-on tabs in various versions, which are used as a pair per
hoof.
Plastic Hardness:
Choosing the Right Base Plate for Your Horse’s Glue-On Shoes
When selecting the horseshoe and the appropriate glue-on tab or collar, you should always take the season into account. With few exceptions, our plastic and composite horseshoes are available in two different hardness levels: a slightly harder Extra blend – ideal for warmer summer temperatures – and a Standard blend that provides better slip resistance in winter. For moderate temperatures, many horses do well year-round with the Standard version.
Of course, the hardness level of the base plate is closely related to its abrasion resistance and, in turn, to the overall durability of the glue-on horseshoe. For more on this topic, see FAQ → Abrasion and Durability.
Plastic Hardness:
Choosing the Right Glue-On Tab for Your Horse’s Glue-On Shoes
When selecting glue-on tabs or collar, the hardness of the plastic plays a key role – not so much in terms of abrasion, but due to the material’s specific properties. A glue-on tab made of softer plastic is easier to adapt to irregular hoof walls. However, a softer tab is also less resistant under heavy stress and may become too soft in high summer temperatures. This can affect the durability of the glue-on horseshoe and increase the risk of early loss.
Good to Know: Wolf Busch® Glue-On Tabs with Color Additives
When color is added to the plastic of Wolf Busch® tabs, some of the material properties change slightly. Colored versions differ subtly from transparent ones – for example, in melting point during welding or in flexibility.
Optimal Nailless Hoof Protection: Durability and Stability for Your Horse’s Glue-On Shoes
The following is a general recommendation intended to serve as a guide. Please don’t see it as a rigid rule,
but as support to help you find the ideal glue-on horseshoe for your horse.
In addition to our recommendations, several other factors should be considered when selecting the best
glue-on solution. These include, among others, your horse’s intended use (e.g. riding discipline) and its
individual movement pattern. All of these directly affect the durability and stability of the glue-on
horseshoe on the hoof.
| Requirements for Glue-On Tabs or Collars | Softer Plastics | Harder Plastics |
|---|---|---|
| Products | Wolf Busch® Glue-On Tab 'soft' Glue-On Collar Pro Standard |
Wolf Busch® Glue-On Tab 'regular' and 'Basic' Glue-On Collar Easy and Pro Extra |
| Cold Winter Temperatures | Well suited | Suitable, but more difficult to handle during gluing |
| Moderate Temperatures | Well suited | Well suited |
| Hot Summer Temperatures | Not recommended: increased risk of premature loss of the glue-on shoe | Suitable |
| Irregular Hoof Wall Shapes | Well suited | Suitable, but more difficult to handle during gluing |
| Hooves with Strong Rotation or Sliding Movements | Not recommended: increased risk of premature loss of the glue-on shoe | Generally suitable We recommend using a clipped horseshoe to minimize the risk of early detachment. |
| Jumping and other High-Impact Disciplines | Not recommended: increased risk of premature loss of the glue-on shoe | Generally suitable We recommend using a clipped horseshoe to minimize the risk of early detachment. |
Glue-On Horseshoes – The Properties of Superglue
One of the key factors in applying glue-on horseshoes – also known as nailless hoof protection – is choosing the right adhesive. There are many types of superglue, each with different levels of suitability depending on the ambient temperature and the materials being bonded. In addition to the outside temperature, the storage temperature of the glue also affects how thin or thick (i.e. , low- or high-viscosity) the glue is when applied.
Also keep in mind that once opened, superglue absorbs moisture from the air. This can cause it to begin curing and, as a result, reduce its bonding performance. This too can impact the durability of the glue-on horseshoe.
Safety Instructions for Gluing – Adhesives
When gluing hoof protection, always follow the adhesive manufacturer’s safety instructions. You’ll find them directly on the product page.

In summer, a lack of humidity can become a challenge when gluing on a composite or urethane horseshoe. If the hoof or the surrounding air is too dry, the glue may not activate properly, since it requires a certain level of moisture. In some cases, the glue on the adhesive tab can begin to cure faster than the glue on the hoof wall. How significantly this affects the bond depends on the specific product. On the other hand, high humidity due to rain or fog generally doesn’t pose a problem for the bonding process.
Regardless of whether you're gluing in summer or winter, one thing always applies: the final strength of the instant adhesives we offer is reached after approximately 24 hours. After gluing, the horse can go back to the paddock or pasture as usual, but it should not be under full load before the glue has reached its full bonding strength.
Buy the right instant adhesive| Instant Adhesive | Temperatures above 10°C (50°F) | Temperatures below 10°C (50°F) |
|---|---|---|
| Blitzschnell | well suited | well suited |
| Summer Adhesives: MD Glue EL.4850 and Top2Glue Gel | well suited | less suitable to unsuitable |
| Winter Adhesives: MD Glue 150.424 and Top2Glue Medium | less suitable to unsuitable | well suited |
Last updated: 2026-01-05
FAQ – Frequently Asked Questions about Gluing on Composite and Urethane Horseshoes
How long does a glued-on Duplo horseshoe stay on the hoof?
A properly applied glue-on composite or urethane horseshoe can last just as long as a nailed-on shoe. Even a nailless horseshoe can stay in place for the duration of an average shoeing period of around 6 weeks. In individual cases, the durability of the glue-on shoe depends on how it was applied, the horse’s hoof growth, workload, and individual movement patterns. Ground conditions and the season also play a role in wear. Key factors for optimal durability include professional barefoot trimming, a well-fitted horseshoe, secure plastic welds, and a suitable instant adhesive.
Which instant adhesive is best suited for gluing on Duplo horseshoes?
The choice of adhesive for gluing on composite or urethane horseshoes depends on the temperature: For temperatures above 10°C (50°F), we recommend using the so-called summer adhesives MD Glue EL.4850 or Top2Glue Gel. For temperatures below 10°C (50°F), the winter adhesives MD Glue 150.424 or Top2Glue Medium are suitable. Blitzschnell by Marston Domsel can generally be used year-round. It’s important that the adhesive is fresh, properly stored, and that there is slight moisture present to activate the bonding process.
Can Duplo horseshoes be glued on in winter?
Yes, they can also be glued on during the winter months. The key factors are using an instant adhesive suitable for cold temperatures and ensuring the hoof is clean and dry. Just like in summer, the hoof wall must be properly roughened and degreased before gluing to ensure a secure bond. For winter conditions, we recommend choosing a horseshoe made from the softer standard plastic or equipping the extra-hard version with spikes or studs to ensure sufficient grip.
How do I safely remove a glued-on Duplo horseshoe?
A glued-on composite or utehane horseshoe can be removed using pliers or, more gently, with a hoof knife. The quicker method is to grip the top of the adhesive tab with pliers and carefully pull it away from the hoof. However, to protect the hoof wall, it's often better to separate the adhesive tabs from the hoof using a hoof knife from top to bottom, or to gently rasp off the tabs.
Which Duplo horseshoe is best suited as a glue-on base plate?
The choice of base plate depends on the required stability, hoof size, season, and any desired features. For a glue-on shoe that closely mimics barefoot conditions, our pure plastic shoes are a great option—such as the 'Classic', the 'Base Plate', and the 'Pony' Shoe. Among the composite models, we recommend the Duplo 'Nailless' if you prefer an un-clipped base plate. The Duplo 'Basic' is a cost-effective choice with quarter clips and deeper tread pattern. Positioned between the pure plastic models and those with a steel core is the blueline® evo!, which is also very well suited for gluing.
Which glue-on tab is best suited for Duplo glue-on horseshoes?
Our top recommendation is the Wolf Busch® adhesive tabs. While the Profi and Easy glue-on cuffs have their loyal fans, the Wolf Busch® tabs are usually the optimal choice. Select the appropriate Wolf Busch® tab based on your horse’s hoof shape, the season, and the riding discipline. The softer “soft” tabs, for example, adapt better to irregular hoof walls and are generally well suited for winter. For higher workloads and hot summer temperatures, the regular versions are more stable and durable.
How do I prepare the hoof for gluing on a Duplo horseshoe?
Begin with proper barefoot trimming. Before gluing, roughen the hoof wall using a sanding block (grit 80–120) or a Hoof Buffer. We recommend degreasing the roughened hoof wall below the coronary band and the inside of the adhesive tabs with a degreasing foam cleaner such as MEGA FOAM. Let the foam sit for about 30 seconds, then wipe everything off thoroughly and wait another minute before gluing. Alternatively, you can use 99% isopropanol or another hoof cleaner. We do not recommend using brake cleaner. In general, the hoof must be dry, clean, and free of grease or old glue residue before applying the glue-on horseshoe.
How do I find the right size for a Duplo glue-on horseshoe?
The base plate should be precisely shaped to match the hoof and should extend about 1 mm beyond the hoof wall in the area where the adhesive tabs will be welded. Duplo horseshoes are available in many sizes to fit everything from pony hooves to draft horses (approx. 50–198mm, depending on the model). When checking the fit, the front edge of the shoe should no longer be visible from above, and from underneath, the toe should be only slightly or just not visible. For more details, see FAQ → Sizes and Shapes, where you’ll also find a printable sizing template to help determine the correct size for your glue-on horseshoe.
Can a Duplo glue-on horseshoe be reused ?
A Duplo glue-on horseshoe can be reset under certain conditions. Both the inner layer of the adhesive tabs and the base plate must remain largely undamaged. How well a glue-on shoe can be reused depends on how it was removed, how much wear it experienced, and which version of the adhesive tabs was used. When in doubt, it’s always safer to use a new shoe. For more details on reusability, refer to the individual product descriptions.
What should I do if the glue cures too quickly or doesn't bond well in summer?
In summer, very dry air can cause the instant adhesive to cure faster on the adhesive tab than on the hoof wall. In this case, using a suitable summer adhesive and, if necessary, an activator likePre Fix by Glue-U can help. The activator significantly shortens curing time and improves bond performance.