


Mini Welding Device
Item No.: 000110V
Manufacturer/Brand: Duplo Verbundbeschläge
159,41 EUR
incl. 19 % VAT
-

- delivery time 3-5 Werktage (*)
- weight 2,99 kg
Are you already benefitting from our commercial conditions? Please contact us!
Plastic Welding Made Easy
Use Our Welding Device For Stable Weld Seams on Your Glue-On Shoes
For a long time, glue-on horseshoes had the reputation of not working and being quickly lost. Even today, when talking to our customers, we often hear concerns about lost shoes. However, those who, like us, delve into the subject in detail, find that the application of glued horseshoes is now effective and reliable. Furthermore, glue-on horseshoes are increasingly gaining significance in the equine market.
The decision to glue a horseshoe is often made out of necessity. However, more and more horse owners are also choosing glued horseshoes out of conviction, and thus, adhesive shoeing is slowly but surely emerging from its niche. The products for glued hoof protection have now become a significant part of our range. Advancements in adhesive technology have also contributed to an overall improved durability of glued horseshoes. In the past, glued horseshoes were often viewed as a temporary emergency solution. This perspective is now a thing of the past, and many horse owners opt for glue-on shoes.
Overall, it is evident that glue-on horseshoes now present an attractive alternative to traditional shoeing. An increasing number of horse owners recognize the benefits of glued hoof protection and consciously opt for it. Therefore, it is no surprise that glue-on shoes have firmly established themselves in the equestrian world. The market responds to this demand by offering a variety of products and solutions.
Among these solutions is our welding device, specifically designed for plastic welding our products using hot air.
It is important for us to emphasize that gluing horseshoes also requires professional handling. An experienced farrier should master the necessary glue-on techniques to correctly apply the shoes and the horse owner and/or rider must regularly inspect the glued hoof protection, just like any other kind of hoof protection.
Why should you use the device for your plastic welding tasks?
Our specially developed welding fixture enables consistent and stable weld seams while simplifying the workflow and saving time.
- Time Saving – plastic welding the glue-on tabs to the horseshoe with the device is quicker than without
- Durability - the material of the welding plate is galvanized and won't corrode
- Flexibility - both your hands are free during the welding process and can take care of important details
- Uniformity - even as an untrained user, our device helps you heating the horseshoe and the glue-on tabs evenly and achieving uniform and thus stable welding seams
- Precise Airflow – The hot air flow is precisely directed thanks to the device, preventing, with careful application, for example, the redirection of the hot air flow onto the inner layer in the case of Wolf Busch® tabs.
- Ergonomic Working - The Standard device is partially height-adjustable for more comfortable working.
- Reliability - the reproducible and uniform welding seams make your glue-on horseshoes more durable and more successful. This applies regardless of whether the base plate is a composite horseshoes or a pure plastic shoe without a metal core.
Mini vs. Standard Device – Combination Options
| Model | Standard | Mini |
|---|---|---|
| Vise | possible | possible |
| Hoof stand | possible | only with manual adjustments |
| Anvil | possible | only with manual adjustments |
| Height-adjustable | depending on the selected combination: between 90 cm and 107 cm | no |
| Reduction Nozzle | The modified Reduction Nozzle is compatible with the hot air guns HL/HM 1920 E, HL/HM 2020 E, HG/HM 2120, HG/HM 2220, HG/HM 2320, MH 3, MH 5 from the Steinel brand. | |
Plastic Welding with the Welding Device
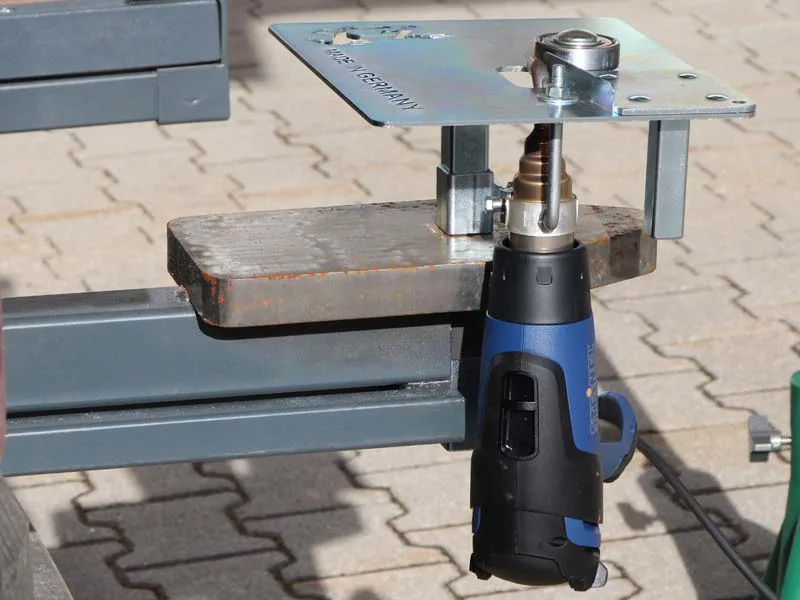
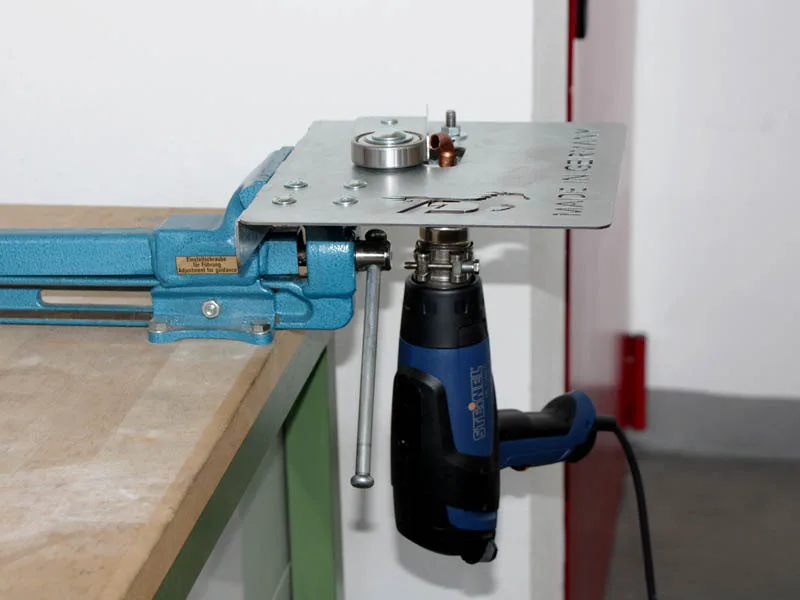
The standard welding device on the anvil.
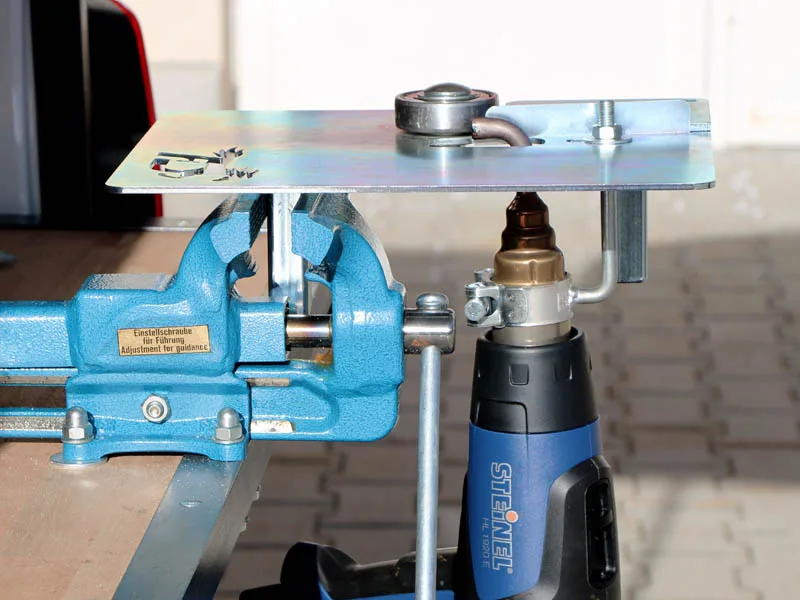
The standard welding device in the vise.
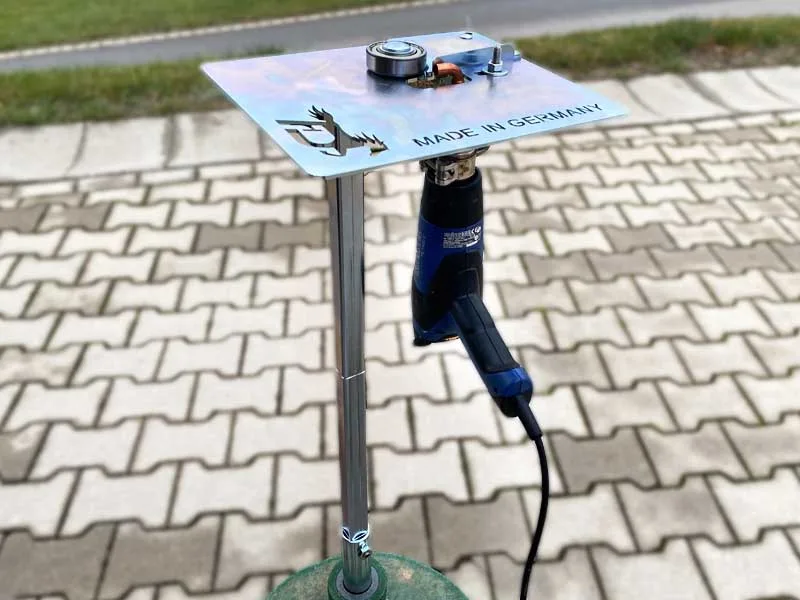
The standard welding device on the hoof stand.
The Mini welding device cannot be mounted on the anvil or hoof stand without manual adjustment.
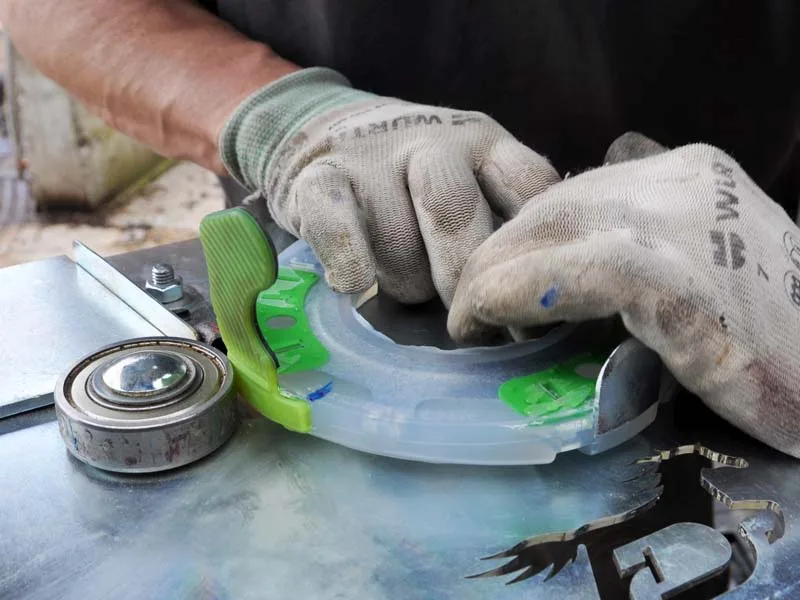
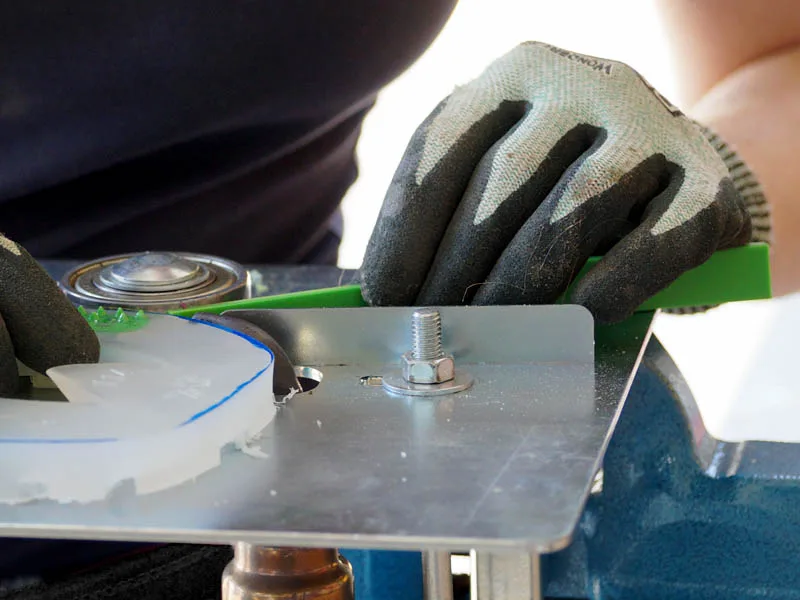
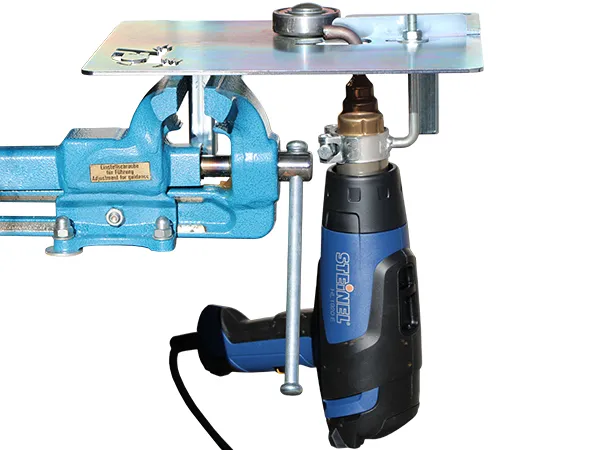
The Mini welding device, just like the Standard version, can be easily attached to a vise.
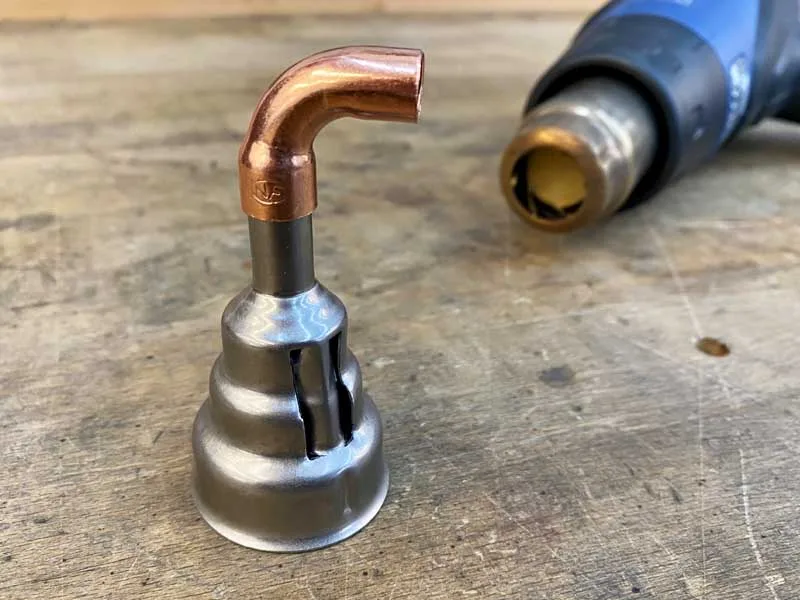
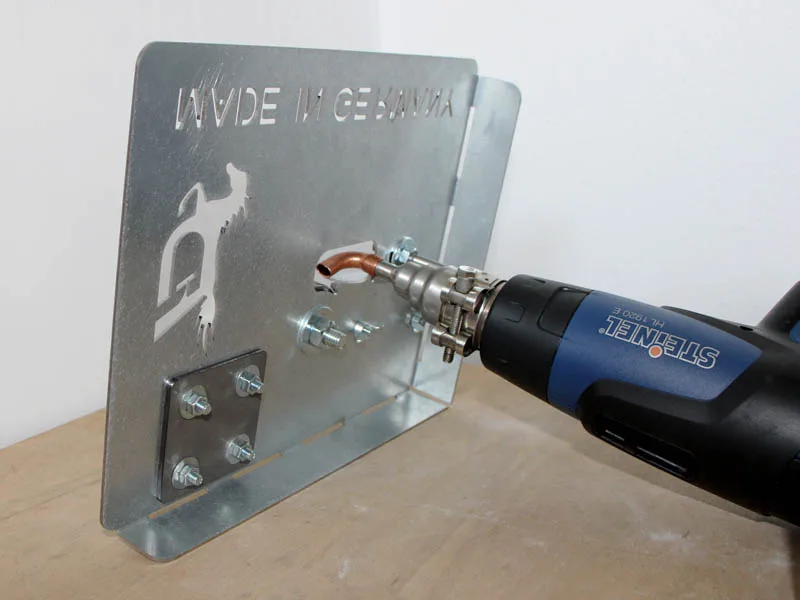
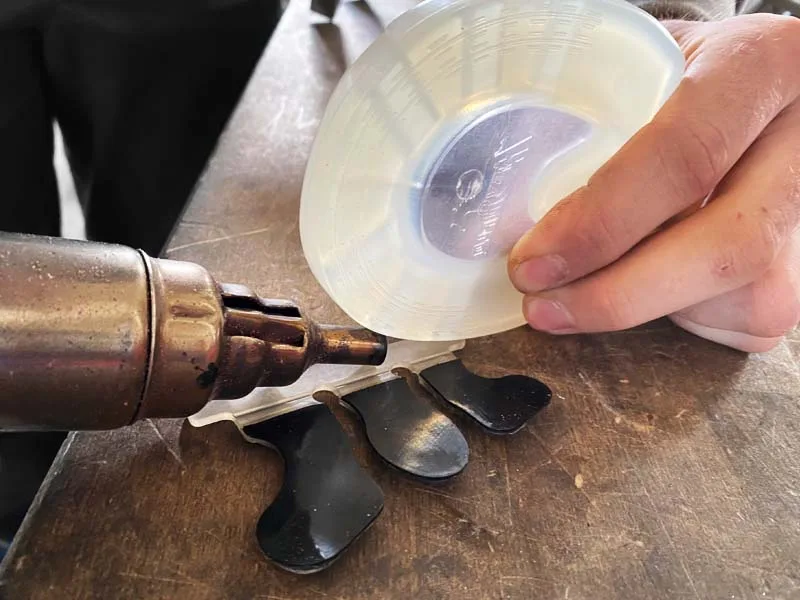
Both plastic welding devices come with a Steinel reduction nozzle and the required special attachment. This special attachment ensures that the airflow is precisely directed to the components being welded.
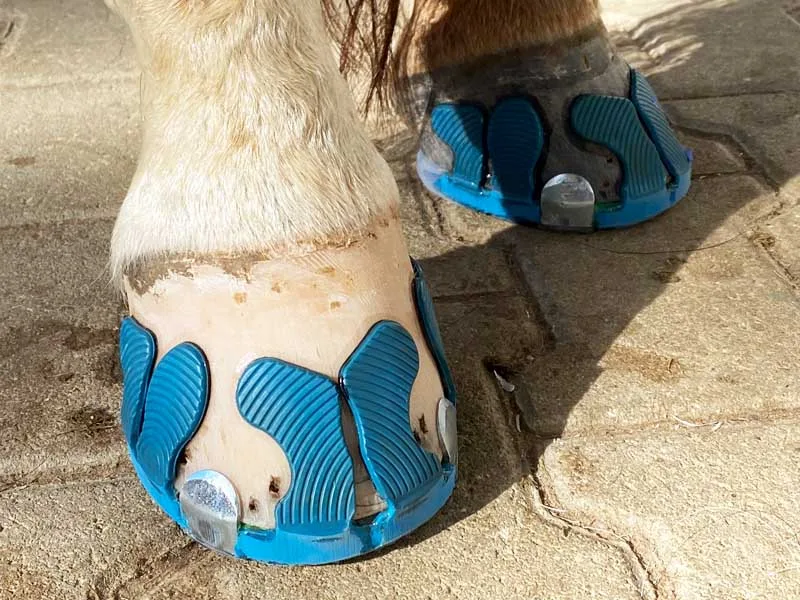
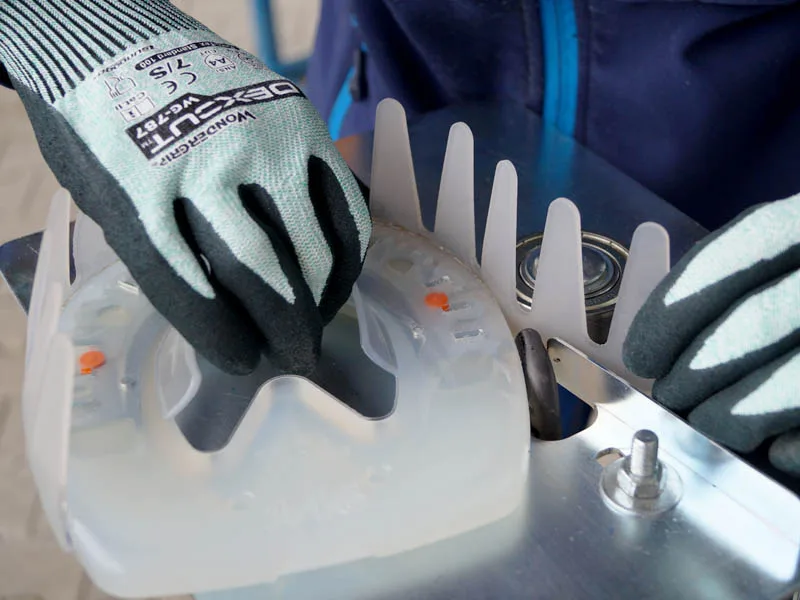
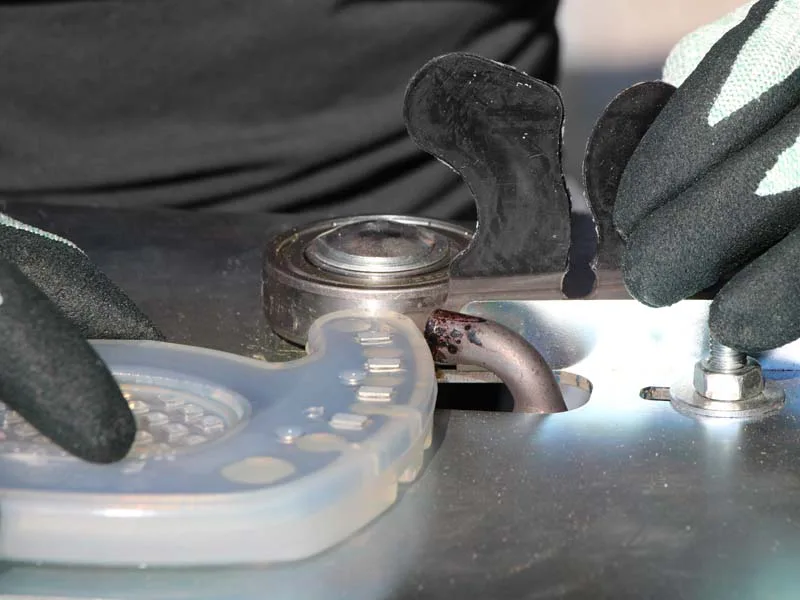
In case of a clipped horseshoe, the glue-on tabs are split and welded in front and behind the quarter clips.
The welding device is also suitable for “hot air bonding” of the color strips to the horseshoe.
Certainly, our adhesive collars Pro and Easy can be plastic-welded onto a composite or pure urethane horseshoe using our welding device.
Application and Safety Instructions for Plastic Welding - Video
Plasic Welding Procedure with the Welding Device
Before you start the welding process, please remember to optimize the horseshoe to fit the horse's hoof and to sand down any existing knobs . We would like to point out that it may also be necessary to adjust the adhesive tabs to the hoof. For further details, please refer to the respective product descriptions.
Further tips for a successful adhesive shoe can be found in our video tutorial , in the glue-on instructions on our website (FAQ → Instructions), and of course, in the product descriptions of the adhesive collars or tabs.
Duplo Standard Welding Device
General Notes – Step by Step to a Stable Weld Seam
- Roll the horseshoe slowly and evenly.
- Mark the starting point and endpoint of the weld intentionally by applying slightly more pressure.
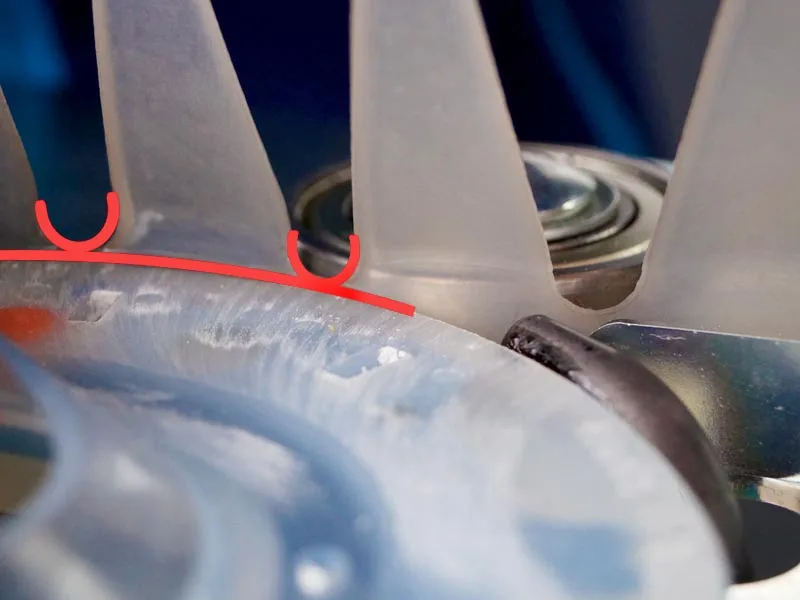
- Along the entire length, a glassy bead should be visible at the welded edges.
- After completing the welding, check the fit on the hoof and round off the welded edges slightly towards the bottom side.
The Spacer Plates
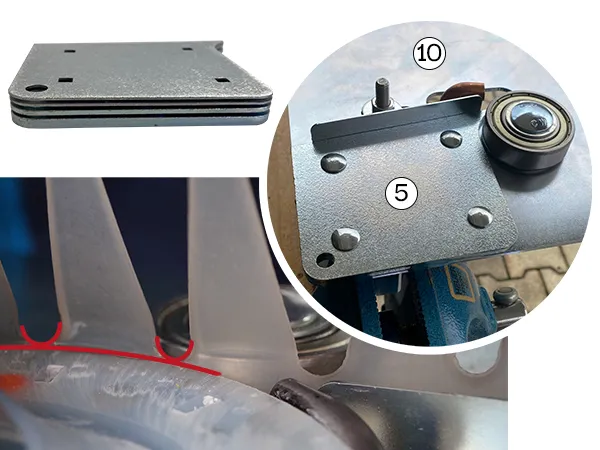
When gluing, it is important that the adhesive collar / tab does not protrude into the profile of the horseshoe or extend beyond the bottom edge of the horseshoe.
Use the appropriate distance piece. Depending on the shoe or adhesive collar/tabs, you will need a different distance piece. Ensure that the lowest point of the circular curvature between the tabs is flush with the upper edge of the horseshoe.
For the color strips, you do not need a distance piece.
Tips and Tricks for Successful Plastic Welding for Effective Hoof Protection:
Here's a tip for everyone starting to glue: Take a look at our starter sets. Your purchase becomes doubly beneficial thanks to the set items: not only do you save time with a quick purchase, but you can also benefit from the additional price advantages of the set items. The M-set includes the Mini device, and the L-set includes the Standard welding device.
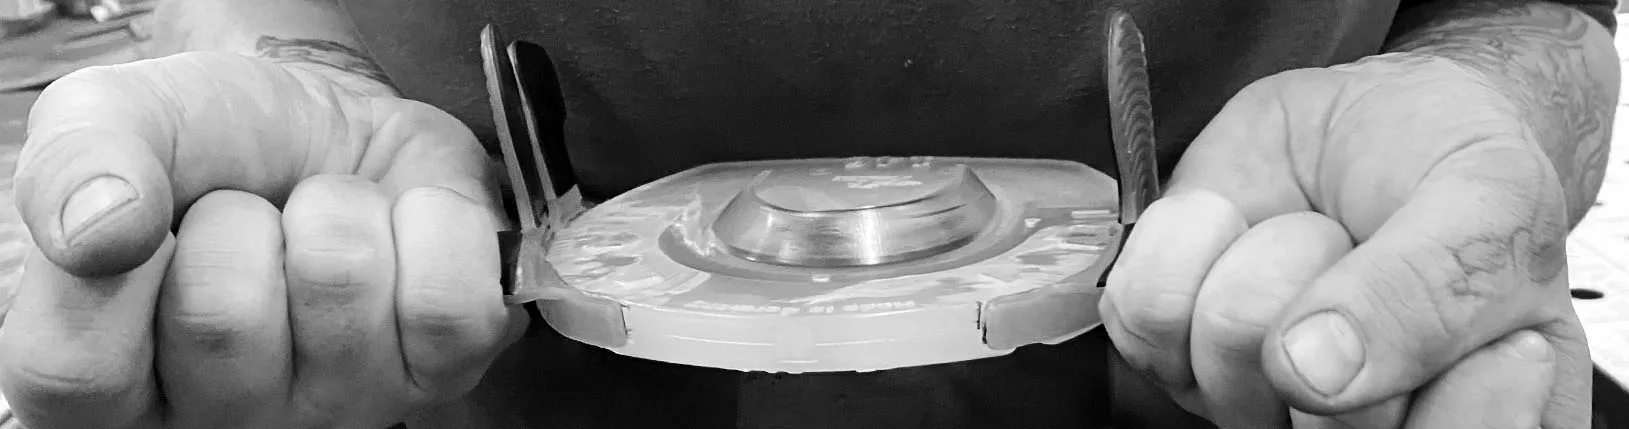
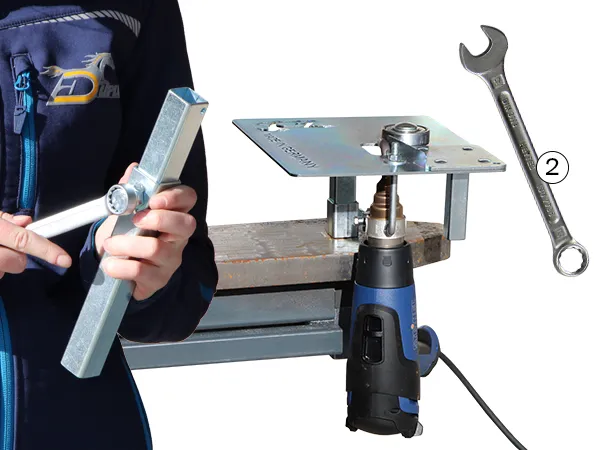
Tear Test - Check the Stability of the Welded Seams of the Adhesive Shoe
The welded seam of the adhesive shoe will be subjected to immense forces on the hoof. Therefore, we always recommend conducting a tear test once the welded seam has cooled down.cv
If the plastic welding fails during this manual check, the adhesive shoe would likely not hold well on the hoof for long. Do not hesitate to pull with full force because the forces later acting on the welded seam on the horse's hoof are much greater.
The Correct Speed for the Welding Work
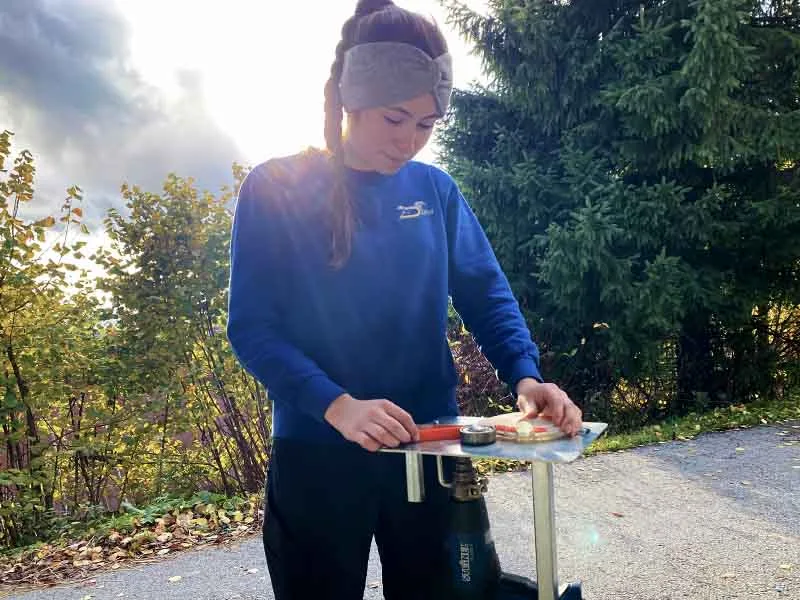
Whether you rotate the horseshoe horizontally using the welding device or roll it vertically on another surface to weld it to the adhesive collar, it is important to execute the movement slowly but at a consistent speed to achieve a uniform welded seam.
Here, one of the greatest advantages of plastic welding with our welding device becomes apparent again because you have both hands free to focus on the plastic parts, as the hot air gun is fixed in the device. When welding on another surface, you may need to hold the hot air gun in your hand, which can also lead to the hot air flow not being precisely centered between the tab and the horseshoe.
For successful welding of alternative adhesive shoes, not only a steady hand but also knowledge about the plastic used for the shoe or the adhesive tabs is crucial.
With the exception of the Duplo Arizona , the glue-on tabs abnd collars can generally be combined with all plastic and composite shoes in our range. They are compatible with standard and extra shoes as well as models made from regranulate . Depending on the plastic compound and temperature, it may be necessary to adjust the hot air gun temperature and the feed speed during welding.
Gathering Practical Experience in Plastic Welding for Glue-on Horseshoes
As in all aspects of life, the saying "practice makes perfect" holds true here as well.
Even in adhesive horseshoes, lost shoes can become a safety risk, especially in case of clipped horseshoes. However, even if that's not the case, lost shoes are always inconvenient, both for the hoof care professional and the horse owner.
To make "practice" less costly, we offer a Practice Kit consisting of base plate dummies and adhesive collars. By the way, the Practice Kit is also included in the starter set size L, alongside the Standard device. Furthermore, you will find the Diamond Training Hoof with us, which is well suited for subsequently practicing gluing on the hoof.
At this point, we would like to briefly mention our Adhesive Courses (held in German), where you have the opportunity to try out the welding device. All information about available courses can be found in the 'Further Education and Courses' section. The courses are conducted in German. If you are interested in a course in English, please contact our team. If there is sufficient demand, we may be able to organize something
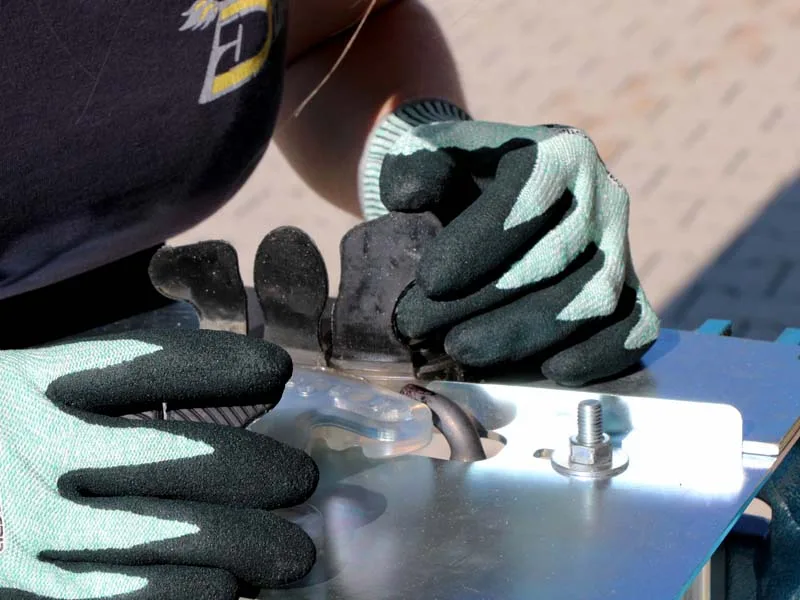
Plastic Welding With the Device
The adhesive collar is securely fixed, the airflow is properly directed, and you have both hands available for the welding work.
Plastic Welding Without the Device
Ensure that the adhesive collar is securely fixed to prevent slipping and make sure that the airflow is properly directed.
Practice makes perfect
Use our practice kits to cost-effectively practice the correct welding technique.
Assembly Instructions and Scope of Delivery of the Welding Devices
Mini Welding Device
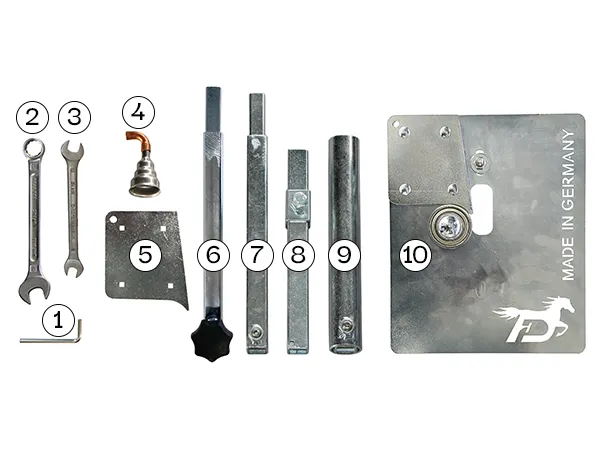
Content and Included Accessories of the Mini Device
- combination spanner wrench 17mm
- open-end wrench 10/13mm
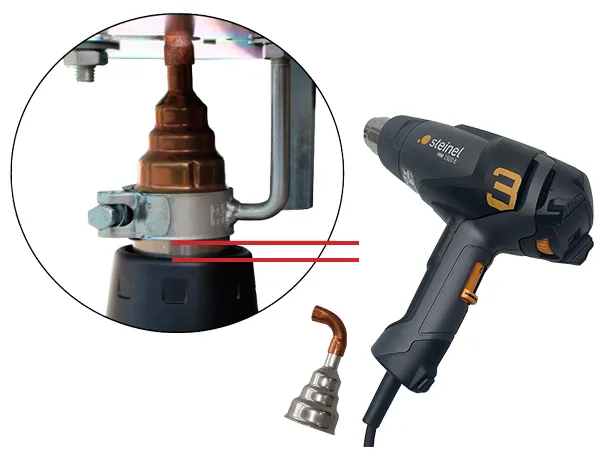
- reduction nozzle 9mm with special attachment
- distance pieces (2x 2mm)
- tinkering piece
- welding board "Mini" and ball bearing
- holder for the hot air gun
The hot air gun is not included in the scope of delivery.

Assembly Instructions
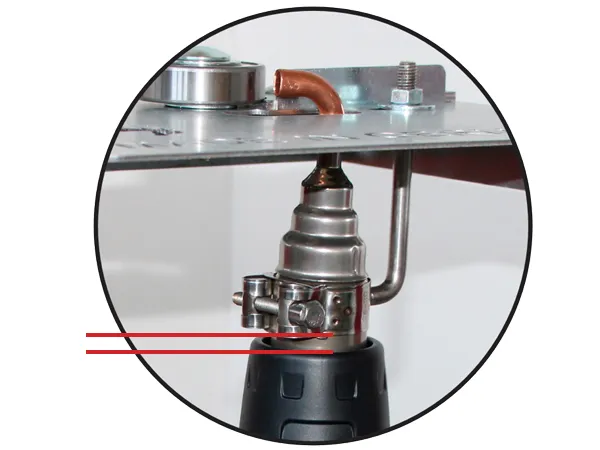
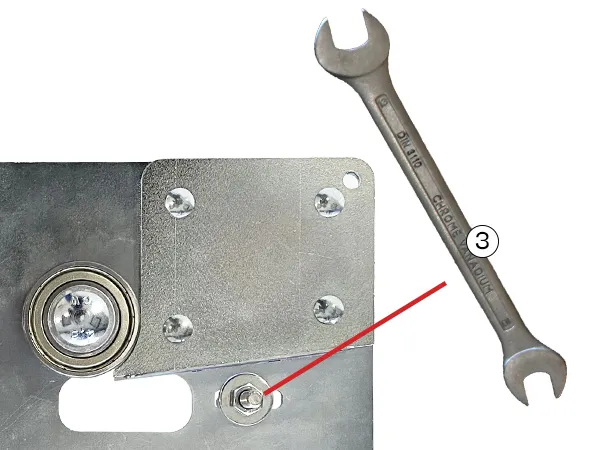
Installing the Hot Air Gun
Put the nozzle (no. 3) on your hot-air gun (type Steinel). Position the hot-air
gun in its mount (no. 7) under the welding board (no. 6).
Use the open-end wrench (no. 2) for fastening the hot-air gun.
Tighten it hand-tight
Attention: The hot-air gun
gets very hot. Do not push it completely up against the mount.
Precise Positioning of the Hot Air Gun
You can also vary the position of the hot-air gun on the upper side of the
welding board.
Use the combination spanner wrench 13mm (no. 2) to
unfasten the nut.
Reposition the hot-air gun along the hole and re-tighten
the nut hand-tight.

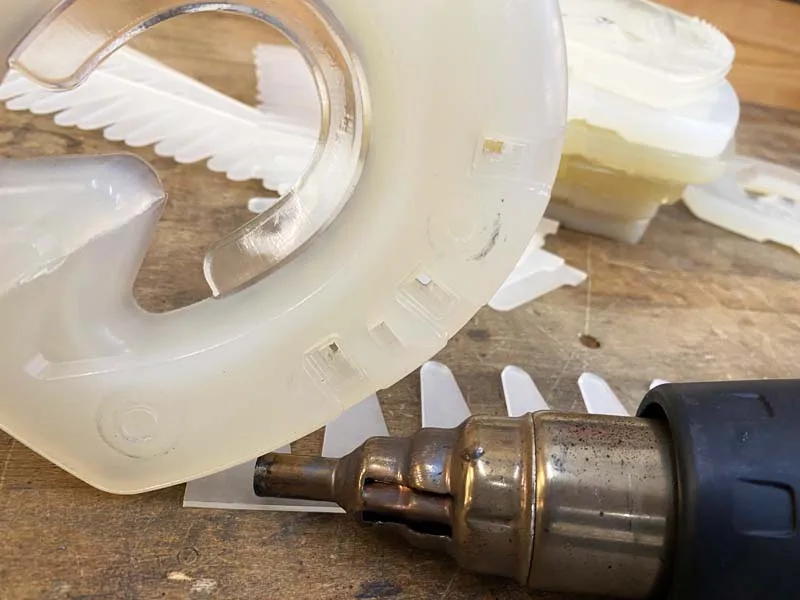
Spacer and Tinkering Plates
We recommend placing both distance pieces (no. 4) on top of each other
for welding glue-on tabs to a Duplo horseshoe. For welding color strips, the
horseshoe and the color strip should be on the same height; we recommend
not using a distance piece (no. 4) in that case.
Recommendation: You can modify the mini welding device by using the
non-galvanized tinkering piece (no. 5) that is fixated under the welding board
Standard Welding Device
Content and Included Accessories of the Standard Device
- hex key
- combination spanner wrench 17mm
- open-end spanner wrench 10/13mm
- reduction nozzle 9mm with special attachment
- distance pieces (2x 1mm, 1x 2mm, 1x 4mm)
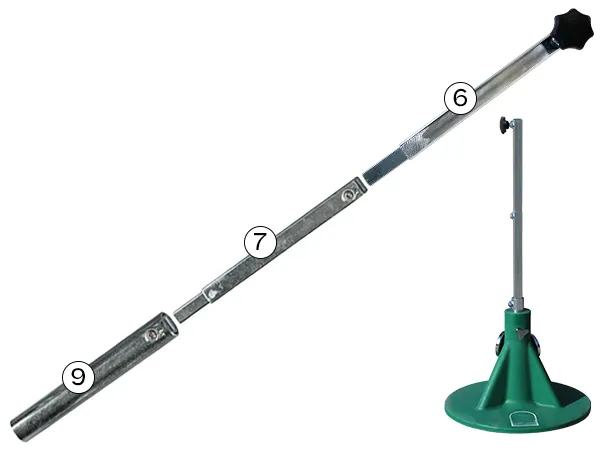
- attachment square pipe with screw handle
- attachment square pipe extension (270mm)
- attachment square pipe for anvil (height-adjustable)
- attachment pipe for hoof stand
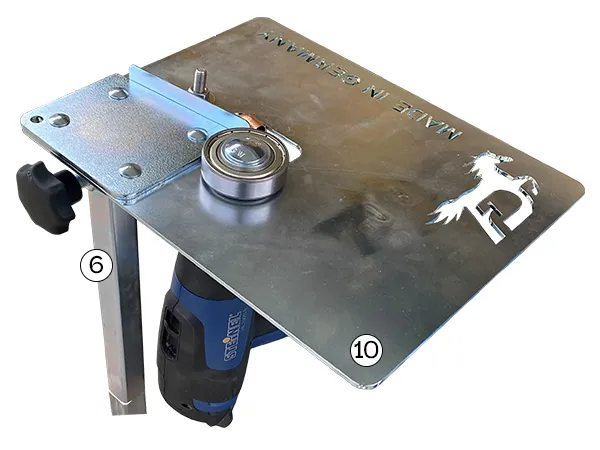
- welding board "Standard" ball bearing, two integrated square tubes, and a holder for the hot air gun
The hot air gun is not included in the scope of delivery.
Assembly Instructions
For Mounting the Welding Fixture on the Hoof Stand (Optional)
Put no. 6, 7, and 9 together and pull them tight with the hex key (no. 1). Fasten them in your hoof stand.
Put the welding board (no. 10) on the square pipe with screw handle (no. 6). Use the screw handle to tighten the board on the square pipe.
Choosing the Appropriate Spacer Plates
Put the appropriate distance pieces (no. 5) on the holes in the welding board (no. 10) and fixate them with the screws. Depending on your horseshoe or glue-on tabs, you need different distance pieces. Choose the distance pieces so that the lowest point of the semi-circular curve between the tabs is flush with the top edge of the horseshoe.
Installing the Hot Air Gun
Put the nozzle (no. 4) on your hot-air gun (see no. 4). Position the hot-air gun in its mount
under the welding board (no. 10). Use the open-end spanner wrench 10mm (no. 3) to fasten
the hot-air gun. Tighten the screw hand-tight.
Attention:
The hot-air gun gets very hot. Do not push it completely up against the mount.
Precise Positioning of the Hot Air Gun
You can also vary the position of the hot-air gun on the upper side of the welding board. Use the open-end spanner wrench 13mm (no. 3) to loosen the nut. Reposition the hot-air gun along the slotted hole and re-tighten the nut hand-tight.
For Mounting the Welding Fixture in a Vise (Optional)
Place one of the square pipes of the welding board (no. 10) in the vise, after the hot air gun has been correctly secured and positioned.
For Mounting the Welding Fixture on an Anvil (Optional)
Place the height-adjustable square pipe (no. 8) in the anvil and fasten it. Use the combination spanner wrench 17mm (no. 2) to adjust the height. Put one of the square pipes of the welding board (no. 10) into the height-adjustable square pipe (no. 8), after the hot air gun has been correctly secured and positioned.
Product Specifications
| General Data and Shipping Information | |
|---|---|
| Model | Welding Devices |
| Device Brand | Duplo |
| Manufactured in | Germany |
| Item Numbers | Mini Welding Device: 000110V Standard Welding Device: 000100V Replacement Reduction Nozzle with Special Attachment: 000120V |
| Package Contents | The scope of delivery depends on the selected model. Detailed information can be found in the assembly and package content section. |
| Exchange and Returns | Possible within 3 months under certain conditions within the European Union (EU). For returns outside the EU, please contact our customer service. Full details can be found under Information → Service & Terms. |
| Function and Applications | |
|---|---|
| Function | Alternative hoof protection, glue-on horseshoes, glue-on applications |
| Glueing Instructions | Our glueing instructions can be found under Information → Instructions. |
| Accessories | Hot air gun, Personal Protective Equipment |
| Safety Information | |
|---|---|
| General Safety Information | Please follow our safety instructions for working with the welding device as well as the safety instructions provided by the manufacturer of your hot air gun, and take all necessary safety precautions for welding. In addition to personal protective equipment and good workplace organization, this particularly includes sufficient ventilation when welding plastics. Ideally, work outdoors. |
| Online Safety Information | Our safety information for the welding devices and other Duplo products can be found under FAQ → Safety Information. |
| Safety Information for Mini and Standard Welding Devices as PDF Download | PDF Download |
| Safety Information for Duplo Products as PDF Download | PDF Download |


Manufacturer in accordance with the Regulation (EU) 2023/988 on General Product Safety (GPSR)
Manufacturer in accordance with the Regulation (EU) 2023/988 on General Product Safety (GPSR)
Name: H. Frank Kunststofftechnik GmbHElectronic Address: info@duplo-frank.de
Physical Address: Vorderfreundorfer Straße 20
ZIP Code: DE-94143
City: Grainet
Country: Deutschland
Phone: +49 (0)8585/96926-0
Responsible Person in accordance with the Regulation (EU) 2023/988 on General Product Safety (GPSR)
Name: H. Frank Kunststofftechnik GmbHElectronic Address: info@duplo-frank.de
Physical Address: Vorderfreundorfer Straße 20
ZIP Code: DE-94143
City: Grainet
Country: Deutschland
Phone: +49 (0)8585/96926-0